Splurge vs Save Skin Care

Thursday, April 30, 2015

As a licensed esthetician for almost 10 years now, I am all about results oriented skincare products. So when I was recently contacted by the CVS/pharmacy beauty team to test out their new CVS/pharmacy exclusive skincare line, Skin+Pharmacy, the first thing I did was research.  I checked out the line, read more about the ingredients and was very impressed.  Not only are Skin+Pharmacy products affordable, but all of their products contain performance driven ingredients that are comparable to pricier skincare products that I have used in the past.  Skin+Pharmacy products are also proven to treat specific skin concerns from acne to the signs of aging such as lines and wrinkles, sagging skin and hyper-pigmentation.

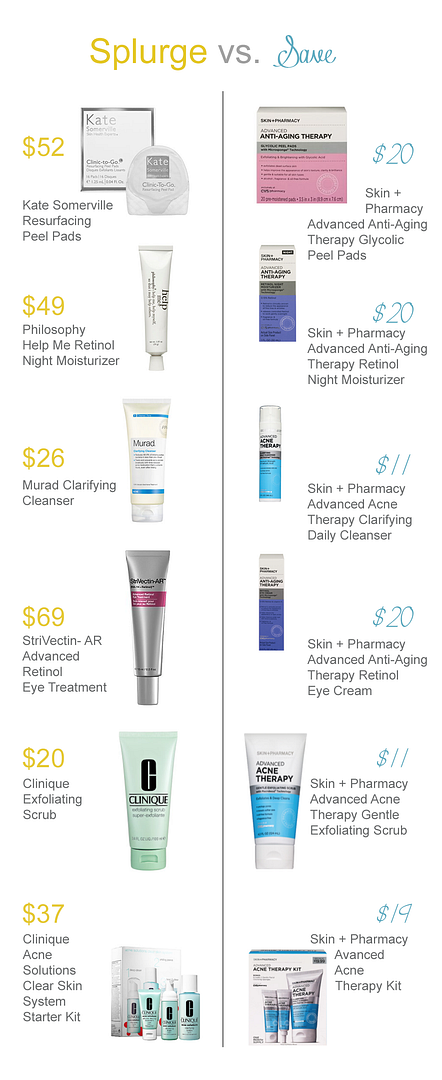
Trying out new skincare products can be somewhat intimidating so above you will find products which you may have already heard of on the pricier side, and then the products that I am currently using and loving from Skin+Pharmacy.  Both products are being compared based on similar ingredients.

You can find the CVS Skin+Pharmacy products listed above here: 1/2/3/4/5/6 and read more about what products I have been using below:

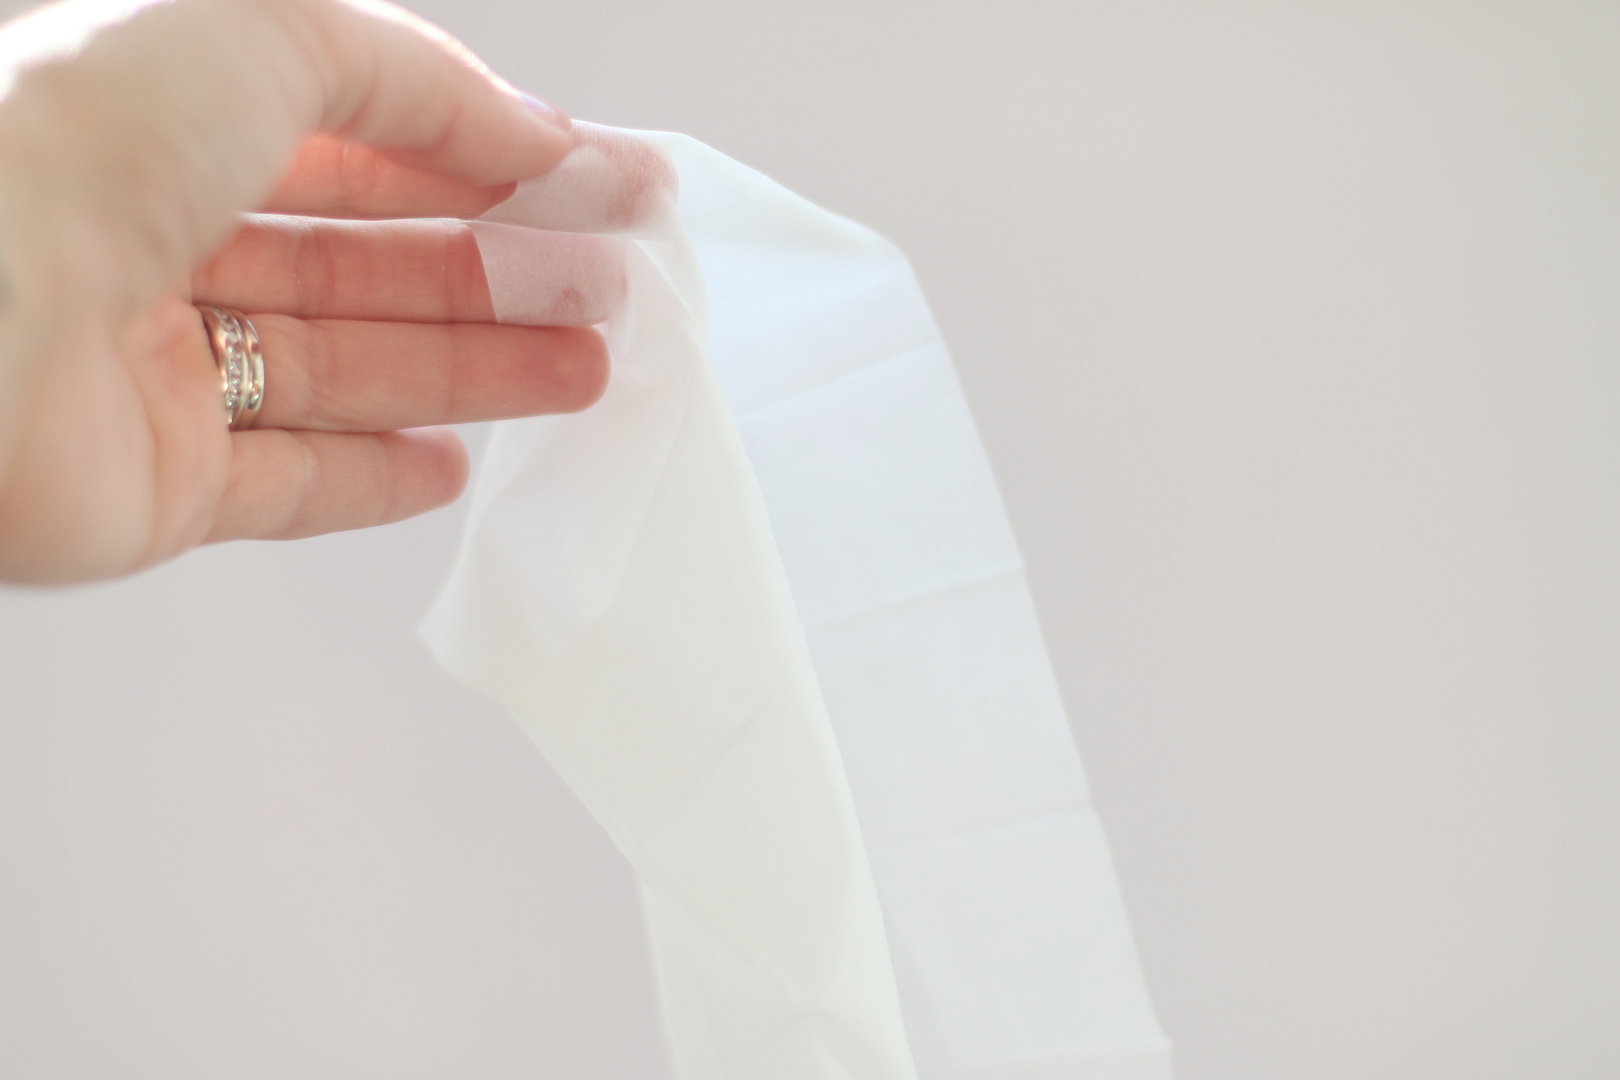
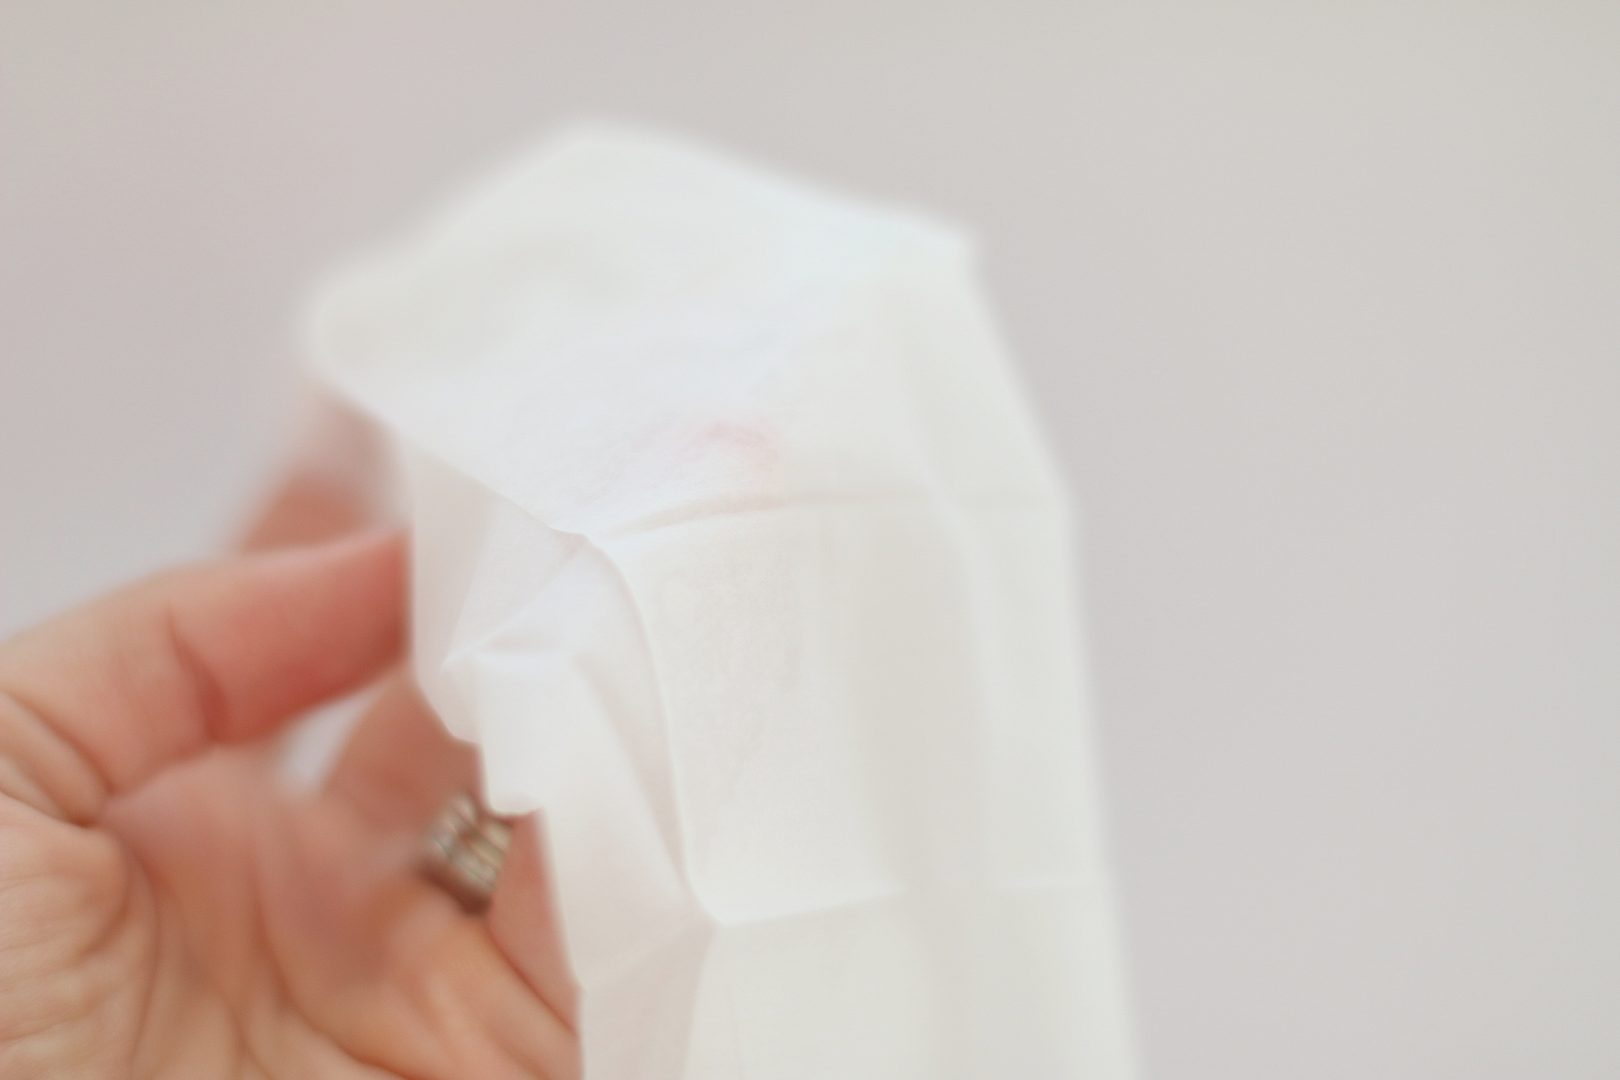
1. Skin+Pharmacy Advanced Anti-Aging Therapy Glycolic Pads - These are the best!  They combine the benefits of a light facial peel along with the convenience of using at home.  They are formulated with soothing ingredients such as calendula extract and Vitamin E and formulated without any fragrance, alcohol or oil.  I have noticed my skin looks brighter and more refreshed since using them.

2. Skin+Pharmacy Advanced Anti-Aging Therapy Retinol Night Moisturizer - I have been loving this!  This contains an overnight time release of retinol as well as Vitamins C and E.  It has been giving my skin that extra hydration that it was craving over night.

3. Skin+Pharmacy Advanced Anti-Aging Therapy Daily Cleanser - This soothing cleanser contains shea butter and Vitamin A, C and E to help fight free radicals. I love how it makes my skin feel clean and soft without over drying it.

4. Skin+Pharmacy Advanced Anti-Aging Therapy Retinol Eye Cream - This contains Vitamin K to help diminish dark circles and reduce the appearance of fine lines and wrinkles around the eye area. I have been loving this! The delicate skin around my eyes appears smoother and the dark circles which always seem present are slowly beginning to lighten. Yeay for that!

If you're interested in testing out the brand for your skincare needs, sign up for CVS Beauty Club (if you're not already a member) for extra savings. Members will receive a 10% off beauty shopping pass after enrollment plus ExtraBucks on your birthday and after every $50 spent on beauty products.  So make sure to sign up so you can start saving!


This post is in partnership with CVS pharmacy.  All opinions are my own. Thank you for supporting the brands that help support this blog.

How To Not Kill Your Fiddle Leaf Fig

Tuesday, April 28, 2015


Before I got my first Fiddle Leaf Fig I had no idea how temperamental these beauties were.  They need some serious care in the most hippie loving way.  I am now the biggest fan of them and love slowly filling my house up with these stunning indoor plants.

One of the most commonly asked questions that I get whenever I share a picture of them on my Instagram is, "How often do you water them and how do you keep them alive?!"

So here are my tips for keeping your Fiddle Leaf Fig alive and thriving:
  1. Keep the soil moist at all times.  If you press your finger down into the soil and it feels dry it is time to water again.  This is usually once every 8 days for me.
  2. Water your plant until you see water coming out of the bottom for a good 10-20 seconds (longer if your plant is bigger).  
  3. Keep your plant in an area that gets plenty of natural sunlight but is not in direct sunlight.  Direct sunlight will damage the leaves. 
  4. On the days where you water, use a spray bottle to spray the leaves to keep them hydrated.  I've noticed that this helps new leaves grow in faster when I do this, opposed to when I do not spray the leaves. 
  5. Turn your plant every couple of days.  Fiddle Leaf Figs like to stretch out their leaves in the directions of the natural light and this will help ensure your plant is getting evenly loved. 
  6. And lastly tell your Fiddle Leaf that you love her or him. Ha totally kidding but hey it couldn't hurt right? ;) 


If you have any other questions regarding how I care for these plants you can leave them below and I will do my best to answer.


The Beauty Tester: Hot Yoga

Monday, April 27, 2015


Horrible picture I know but it was all I got after a sweaty & lights off hot yoga workout. 

For this week's segment of The Beauty Tester series I stepped out of my normal workout comfort zone, which is usually weight training and cardio and tried Hot Yoga for the first time. I have been hearing so many positive things about this and I figured it was time to give it an honest beauty review.  I believe that beauty starts from within and how we treat our bodies physically and mentally so I felt like this was a perfect activity to review. 

My Expectations Before I Tried It: I have tried regular yoga a number times before and to be completely honest, I am always bored out of my mind.  I just can never shut my mind off and get in that fully zen mode and be serious all at the same time. Plus I have always felt that for a workout to feel effective to me, I like to have a good sweat and regular yoga just doesn't give me that. Even though this was "hot" yoga I went into it with the same expectations that I have had about regular yoga.  So I figured it was going to be hot AND boring haha. 

Cost: The studio I went to charged $12 for a single class, $59 for untimed monthly membership and $79 for 10 classes.  See my Instagram for the full details on where I went.

Prep or Directions: My awesome neighbor is the one who initially asked me to go with her so she told me to wear light weight clothing, bring a yoga mat + towel and TONS of water. She also said it's best to not wear any makeup but I figured I wasn't going to sweat that much plus I wanted to take pictures after for the blog so I didn't bother washing my makeup before heading out with her. Bad idea ha! See raccoon eyes above.

When we got to the studio, we entered a dark, very warm room with candles lit all the way around.  There was relaxing spa music playing softly while everyone was finding their spots and getting situated.  It felt very calm.  It was a full class and thankfully we got a spot right next to the door, which I was happy about in case I needed to escape haha!  I laid out my yoga mat and started stretching like everyone else was doing.  The instructor came in, gave us a few words of inspiration then started the class.  In the first 2 minutes I realized this was nothing like boring regular yoga.

Results: The class was an hour long.  Five minutes in I was completely drenched in sweat.  It was HOT and it felt like as the class progressed it kept getting hotter but I could tell my muscles were loving it and loosening up from all the weight lifting that I have recently been doing.  We worked on core, balance flexibility and strength.  A few times it got so intense I wanted to just sit down on my mat in child's pose and take a break but my mind was present  and I wasn't on my phone or being distracted by anything else so I kept powering through and that felt so amazing mentally.  As the class was ending we did a little meditation and at that moment I knew I was hooked to this.  For the first time in weeks (maybe months) I felt like I was able to let all of my stress and anxieties go and fully be present in a workout.

My Rating: A++! This is one of the most intense and empowering workouts I have ever done.  If you  have ever been curious about Hot Yoga I highly recommend giving it a try. You will be so happy you did! 

Things That Make Me Say Yeay

Friday, April 24, 2015


A little day date with myself at Anthropologie.  All the heart eyes goes to this store and the always amazing displays.


How the beet blush + beet lipgloss look when I am wearing them together.  This was also taken after wearing them both for a couple hours. I love the super natural color and it's been my go to for the past week now.


A tiny little bird's nest with an even tinnier little egg on my mom's front porch, which the boys check on every time we visit.


All time favorite coffee mug (husband has the coordinating one). Game of Thrones fans will understand.


I found Ronin like this the other afternoon and it just about melted me. He was so tired and even though his bed was only a few more steps away he felt like the floor was a perfectly good spot for a nap :)

Have an awesome weekend!

DIY Simple and All Natural Tinted Lipgloss

Wednesday, April 22, 2015


I would say I am definitely a lipgloss over lipstick kinda gal.  I have tried so many different lipsticks (thanks a lot Pinterest haha) and each time I put it on I feel like I am seven again wearing my mom's lipstick and it just doesn't feel like me.  Lipgloss on the other hand, always feels light enough to wear daily and yet still glam enough to wear on a night out.

After my recent success with this all natural blush I decided to experiment a little further and try to incorporate beet powder in a lipgloss recipe.  I could not love this more!

What you will need:
  • 1/2 tsp of beet root powder *
  • 1/2 tsp of 100% pure liquid lanolin 
  • 1/2 tsp of almond oil 
* You can find beet root powder in bulk at your local natural grocery store (Whole Foods, Sprouts etc...) or online here

Directions: 
  1. Thoroughly mix all of the ingredients together in a small glass bowl. Make sure you really mash up the beet root powder so there are no clumps. 
  2. Transfer your lipgloss into an empty container with a lid.
  3. Apply and enjoy! 


I love the natural looking, fun punch of color this gives you! If you end up trying this out make sure to come back and let me know what you think!  

Side note: I know most of you want to actually seeeee what the lipgloss as well as natural blush look like on but since I have had a live in gym clothes hot mess looking kind of week I just haven't gotten around to getting cute for a picture.  BUT I pinky promise that I will share a picture of me wearing both in this Friday's post. 


The Beauty Tester: Tan Towel "Look Good Naked"

Monday, April 20, 2015


For this weeks's Beauty Tester series I tried out a product that I felt like I could definitely benefit from, the Tan Towel.  Think of the shade cream and then try to imagine two shades lighter than that and that my friends was the color of my legs before I tried this out.  So hot I know.  So needless to say, I could use a little tan of some kind.  I have heard about the Tan Towel from a few fellow bloggers and friends and I decided it was time to give it a try.

My Expectations Before I Tried It:  Since this promised to give me a quick, easy, no fuss, no streak and even tan that is what I was expecting.  I am a big supporter of spray tans but I always hate the uneven-ness that sometimes comes with those. So with this I was hoping it would look a little more like the real deal.

Cost: $15.00, which includes a package of 2 full body towelettes and 2 half body towelettes.

Prep or Directions: The package said to unfold the towelette and apply to clean dry skin in a circular motion.  After application it said to wash hands and since I know all about oompa loompa hands from the spray tans I did what I was instructed to do.  The tan was supposed to appear after 2-4 hours so I put on my favorite non constricting maxi dress and I waited.


How my legs looked 4 hours post Tan Towel.

Results: After 4 hours I had a great golden looking tan!  Considering how white my legs were to begin with, I was really impressed with the color and overall result.  I did have a few streak marks on my upper thighs where I did not rub the tan in evenly (my fault for rushing the application process) but other than that I loved this!  Plus it did not leave a weird burnt cornflake smell like a traditional spray tan does AND since the tan color is only applied to the areas where you want I didn't have orange hands and orange heels like I usually do with a spray tan.

My Rating: I give the Tan Towel an A!  I am so excited to have found a product that is not stinky plus produces a totally natural looking bronzed tan.  The whole process was easy, quick and mess free.  I will be ordering more of these for sure! 

Have you used this before? I would love to hear what you thought if so. 

Things That Make Me Say Yeay

Friday, April 17, 2015


Our TV pooped out on us last week and it's been in the repair shop all week (not awesome at all). BUT in a weird way it has been a good thing because I am learning to be way more creative at the end of the day with activities as opposed to just turning on a movie for them so I can have a glass of wine and make dinner in peace.  But with all that said I still want it back...I mean Game of Thrones is on and I AM MISSING IT, which is not okay.


Visiting Grandpa's chickens and picking up our weekly batch of fresh eggs.


Spring cleaning and making little piles of things that are going to the Goodwill and things that I am selling on eBay, which makes the whole parting process with things I love (but do not need) just a little bit easier ;)


Trying a grass fed bison burger from The Burger Lounge the other day, which was absolutely incredible.


Newly chopped hair!  It feels so fresh and I am loving the change.

Have a wonderful weekend!

Related Posts Plugin for WordPress, Blogger...