 As of lately I have had a mini obsession with bows. I think they are so feminine and fun to wear. I wanted to create a bow ring made purely of polymer clay. Plus... I think it was time to switch it up from the bangle craze that I have been on.
This does take a little bit of patience (which I don't have) so don't get frustrated if you have to mash up your creation a few times before you get it the way you like.
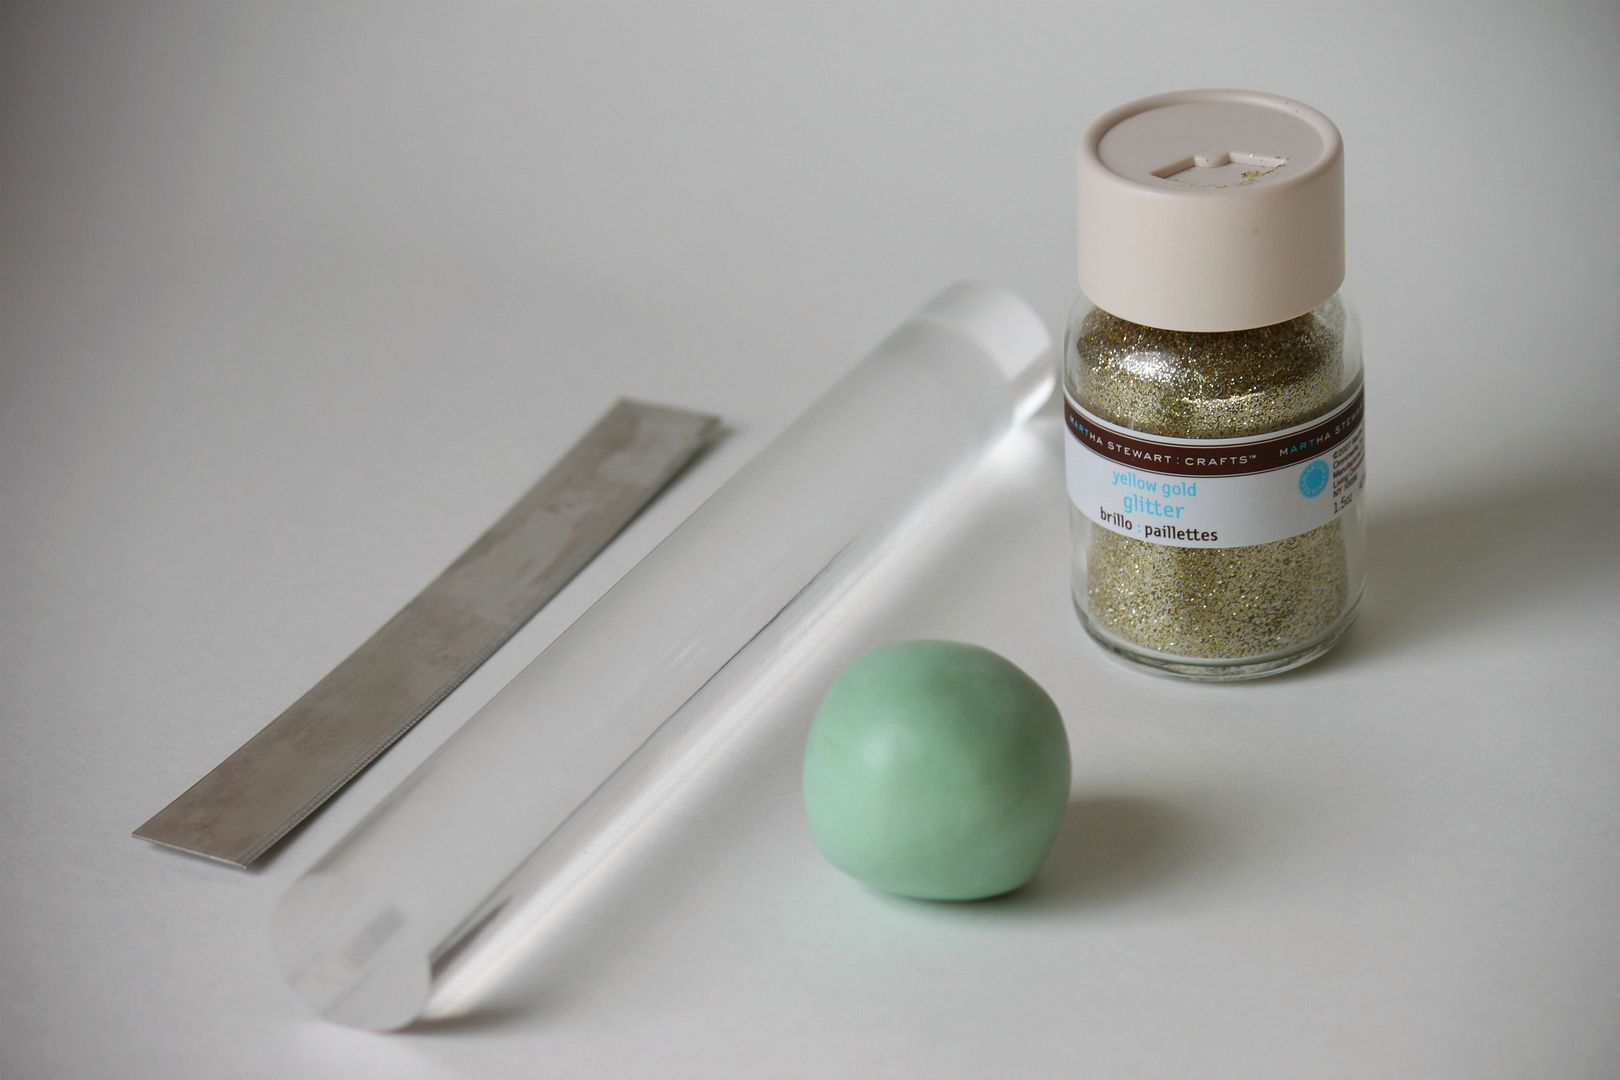
What you will need:
- Razor Blade
- A roller of some kind. I purchased mine at Michaels in the clay aisle.
- Polymer clay
- Glitter.
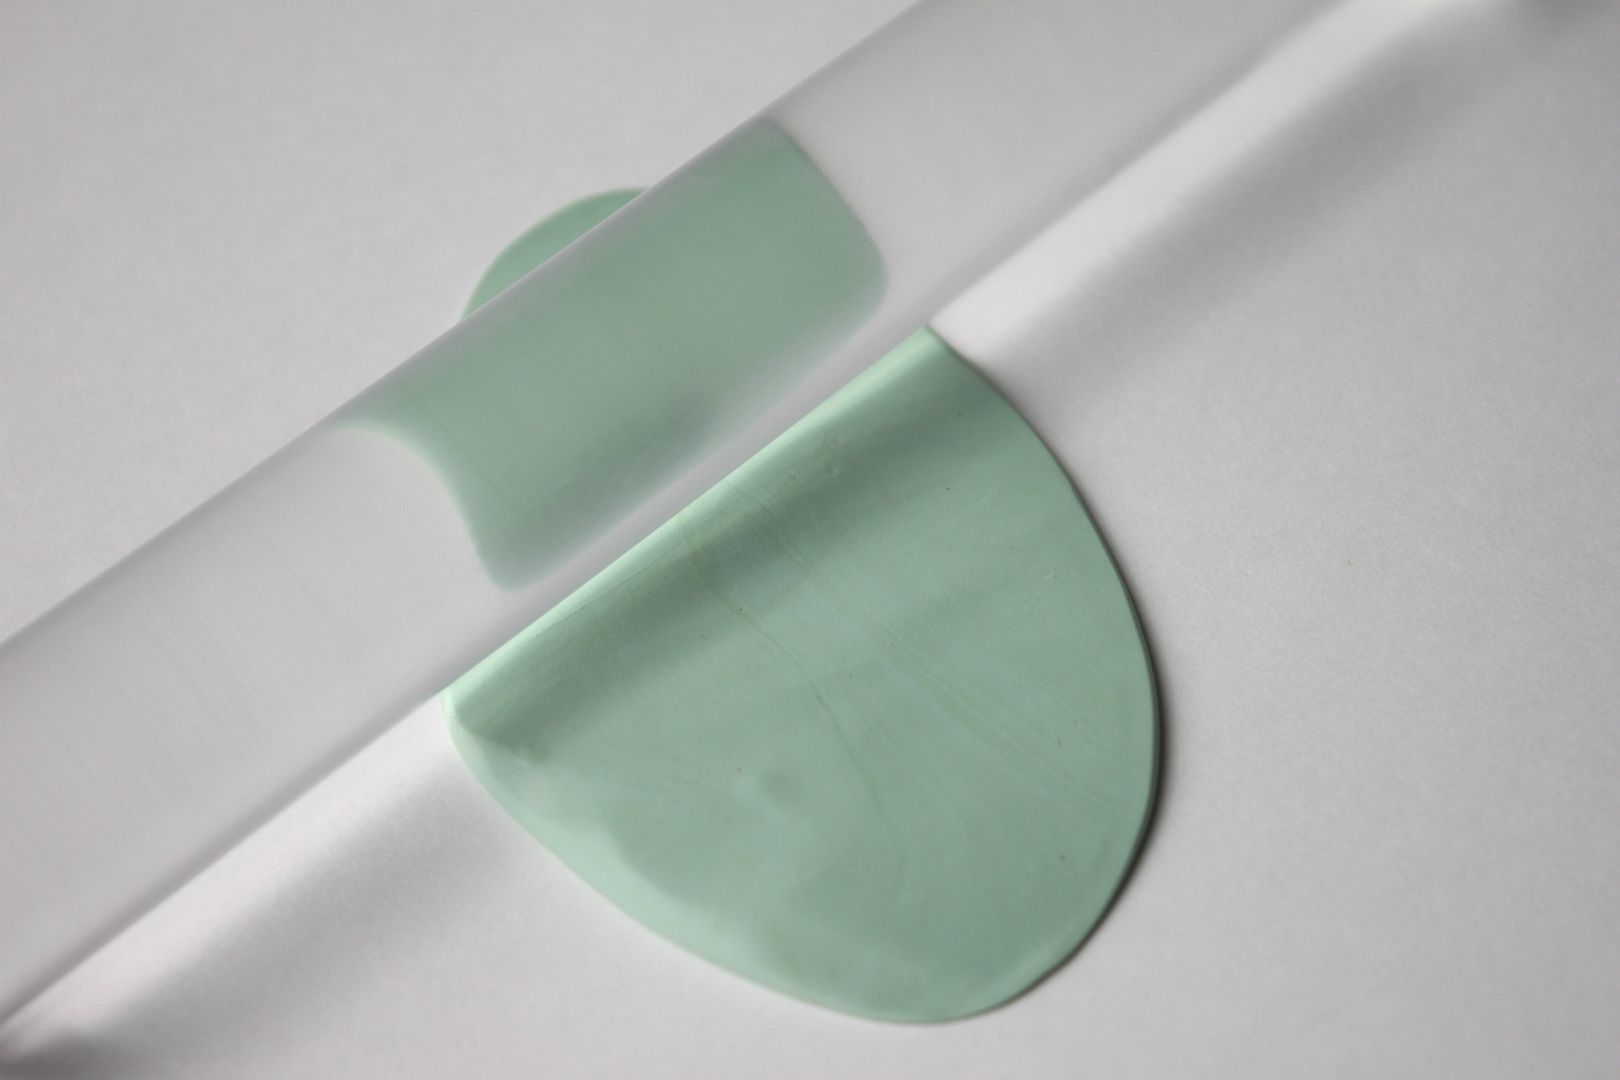 Condition the clay with your hands to soften it up. Use the roller to flatten out the piece of clay.
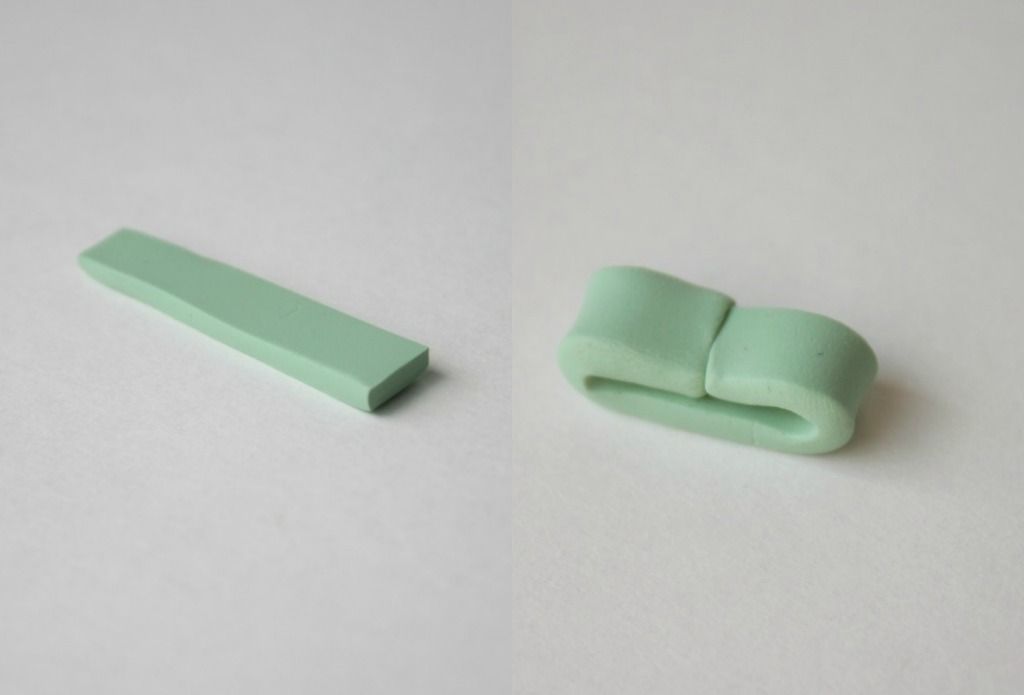 Using the razor blade, slice a piece that is about 1 1/2 inches long. Take the two ends and fold them into the center.
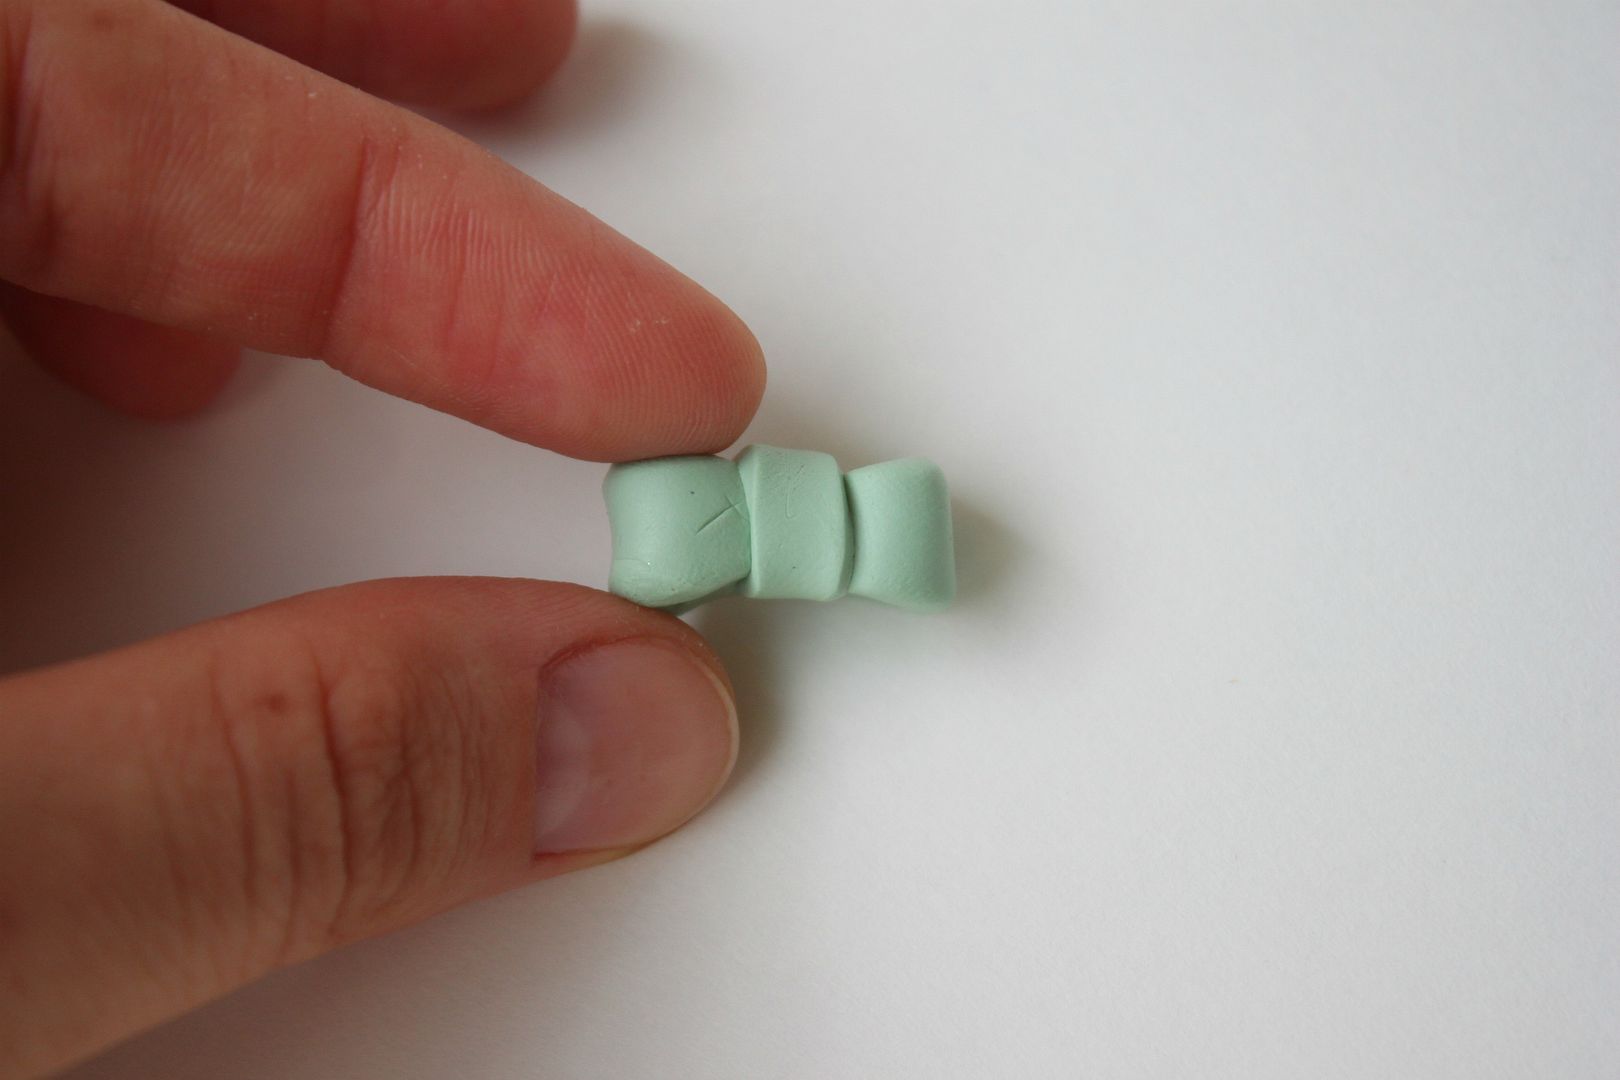 For the middle part of the bow, slice another small piece that wraps around the bow and gently cinch it together in the middle to make your bow flare out a bit.
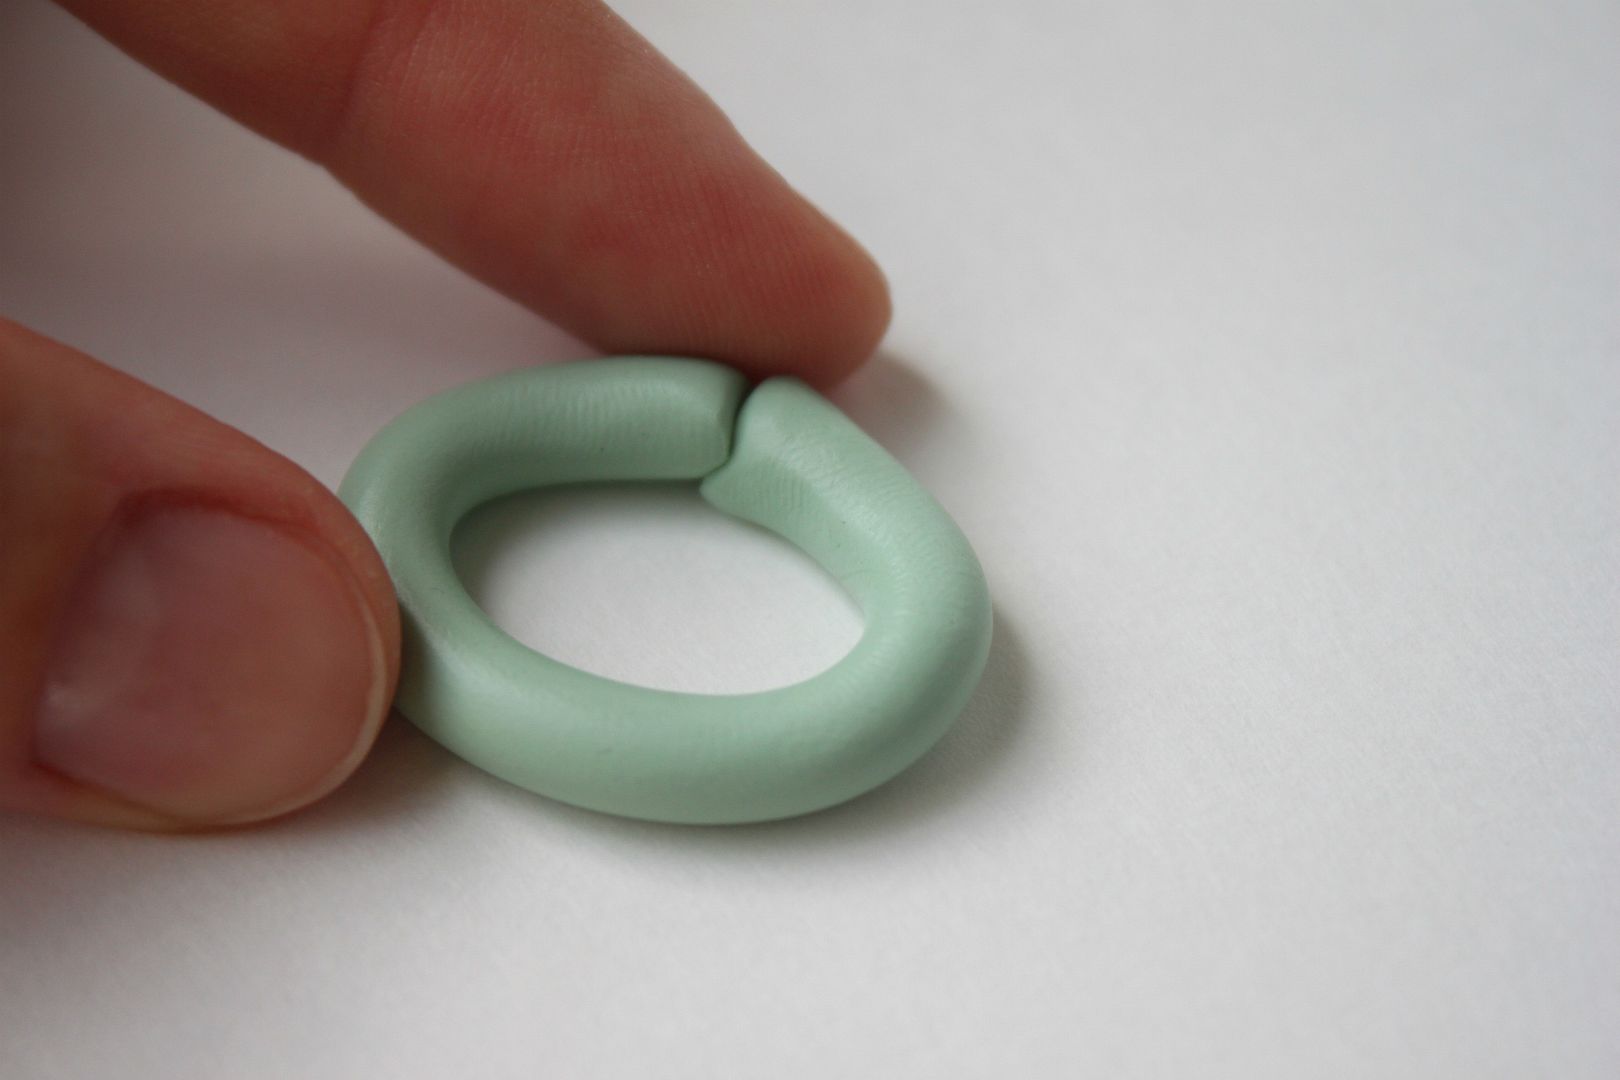 For the actual ring you need to measure your finger first to determine the size you would like to make it. Take a small piece of clay and roll it into a skinny tube. Slice off where you want to connect the two ends. Connect the two ends by gently mashing (maybe fusing is a better word) them together. Use your finger to roll out any unevenness.
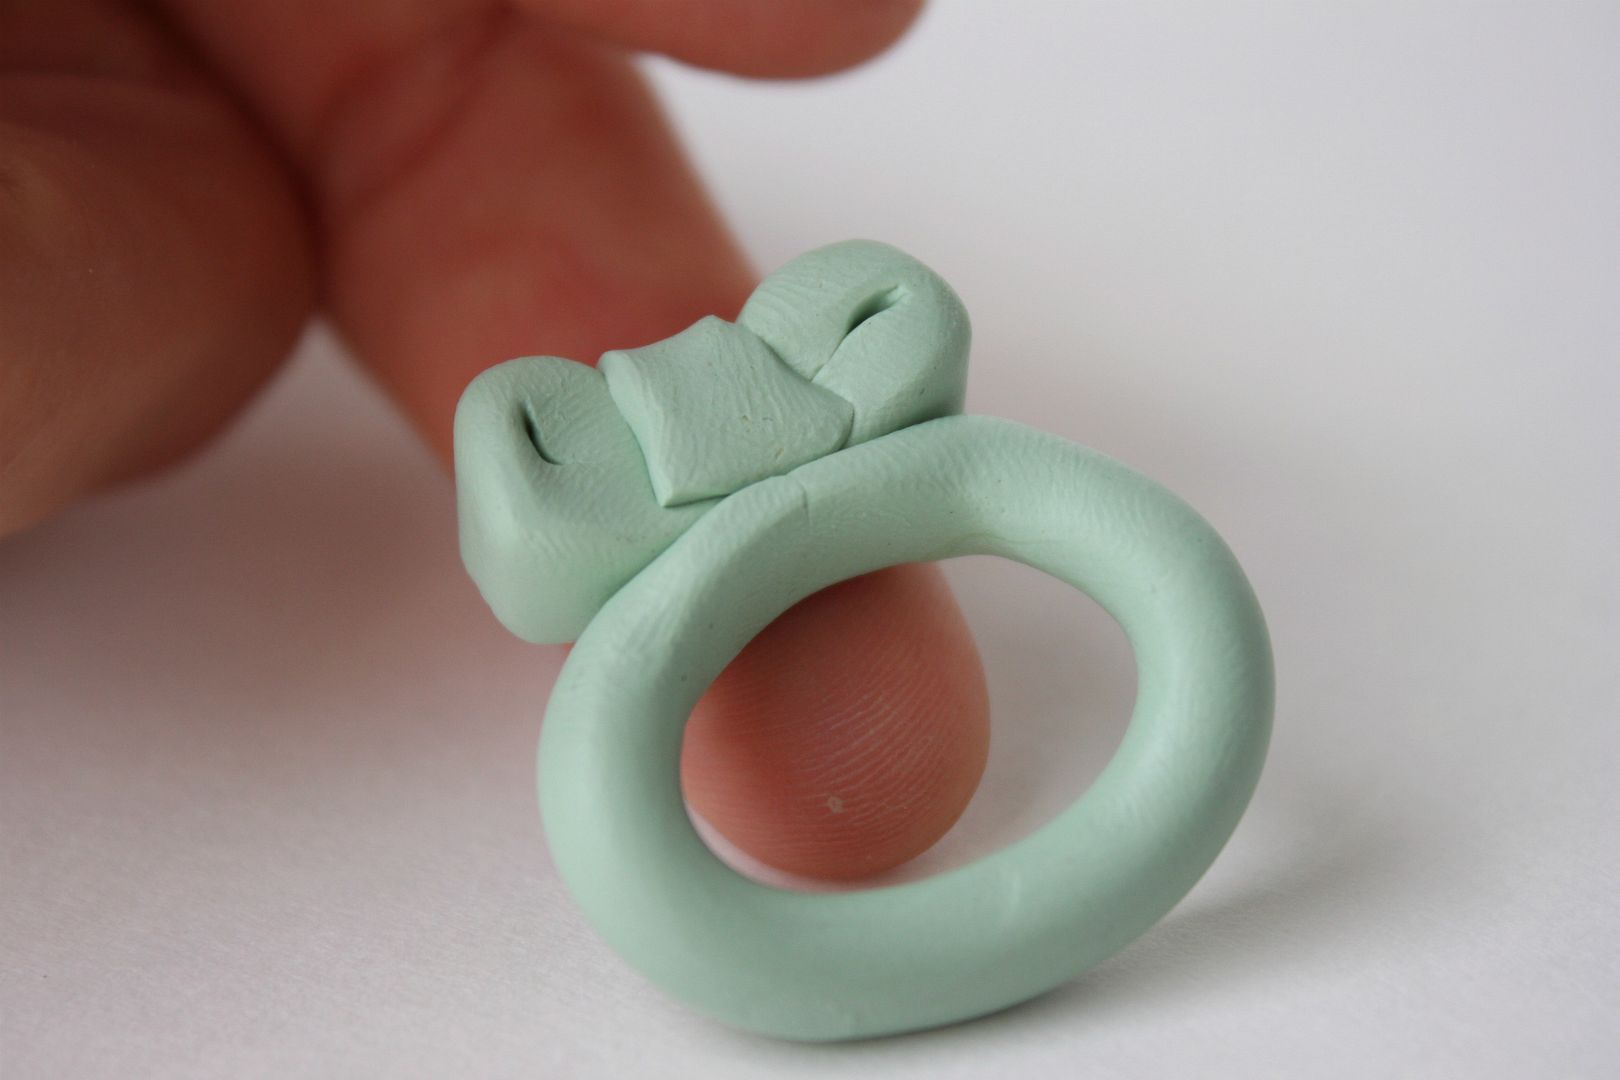 Place the bow on top of the ring where you connected the two ends. Don't worry about fingerprints or minor imperfections. This will all be covered up by the glitter.
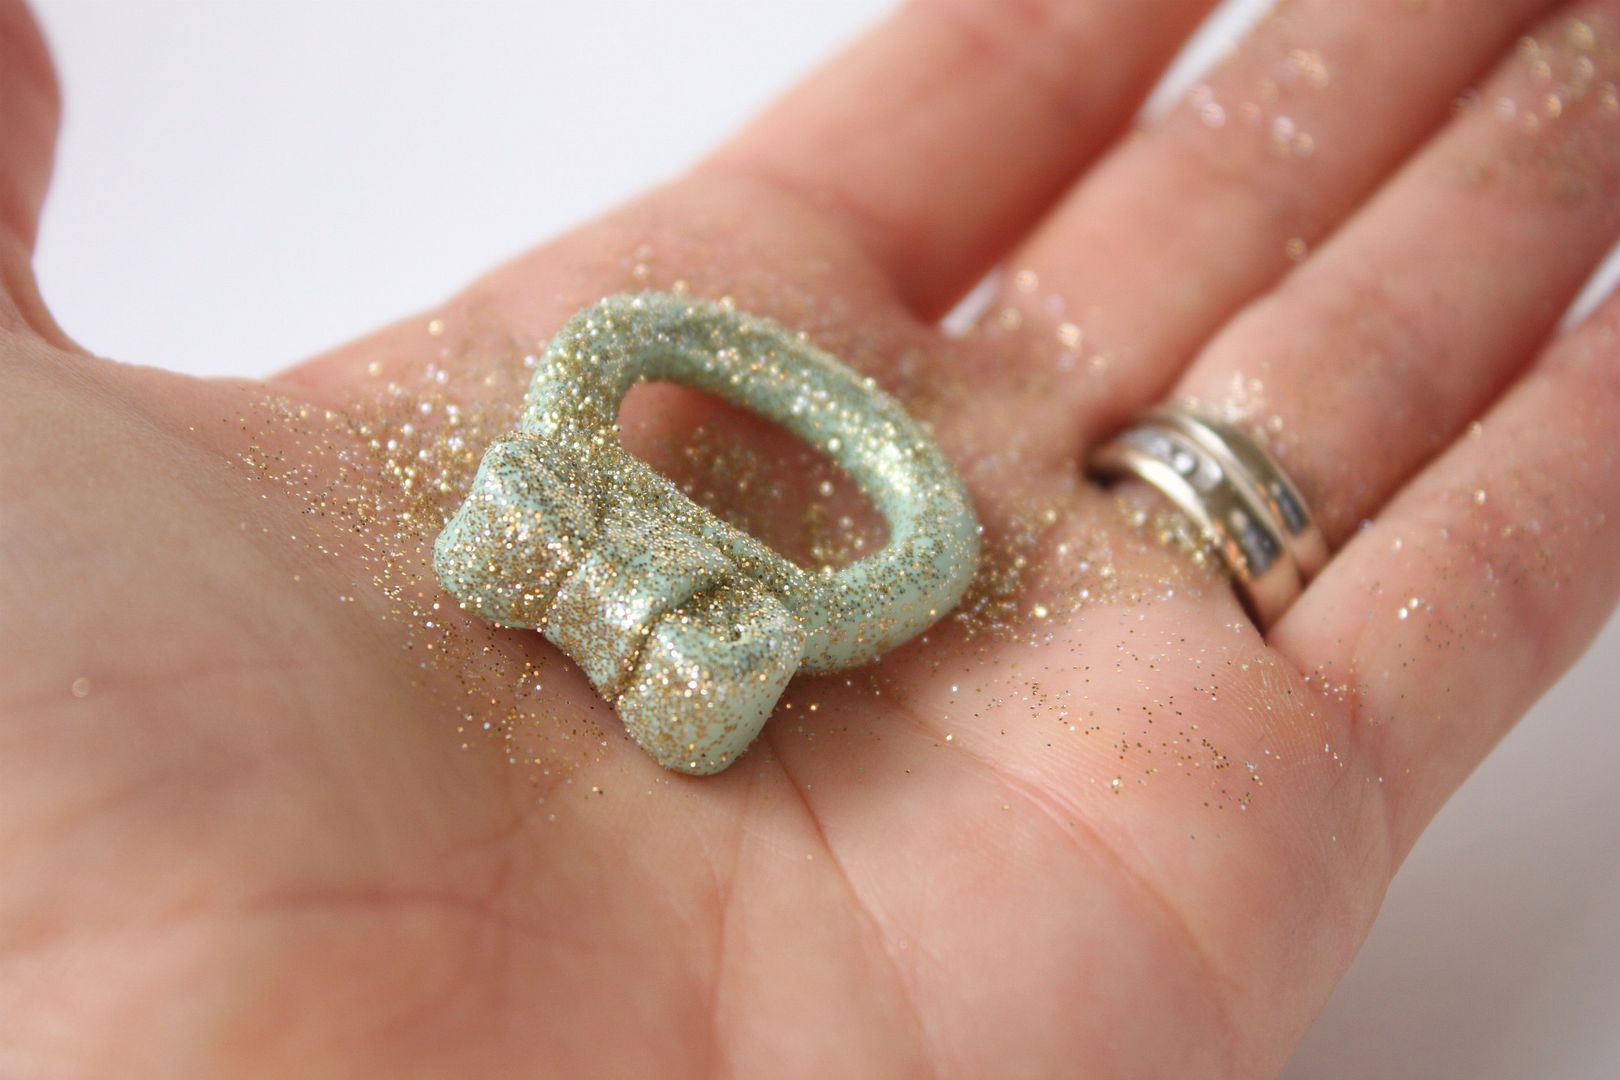 Sprinkle glitter all over your ring. The fun part :)
Place your ring on a baking sheet and bake at 275 degrees for 22 minutes.
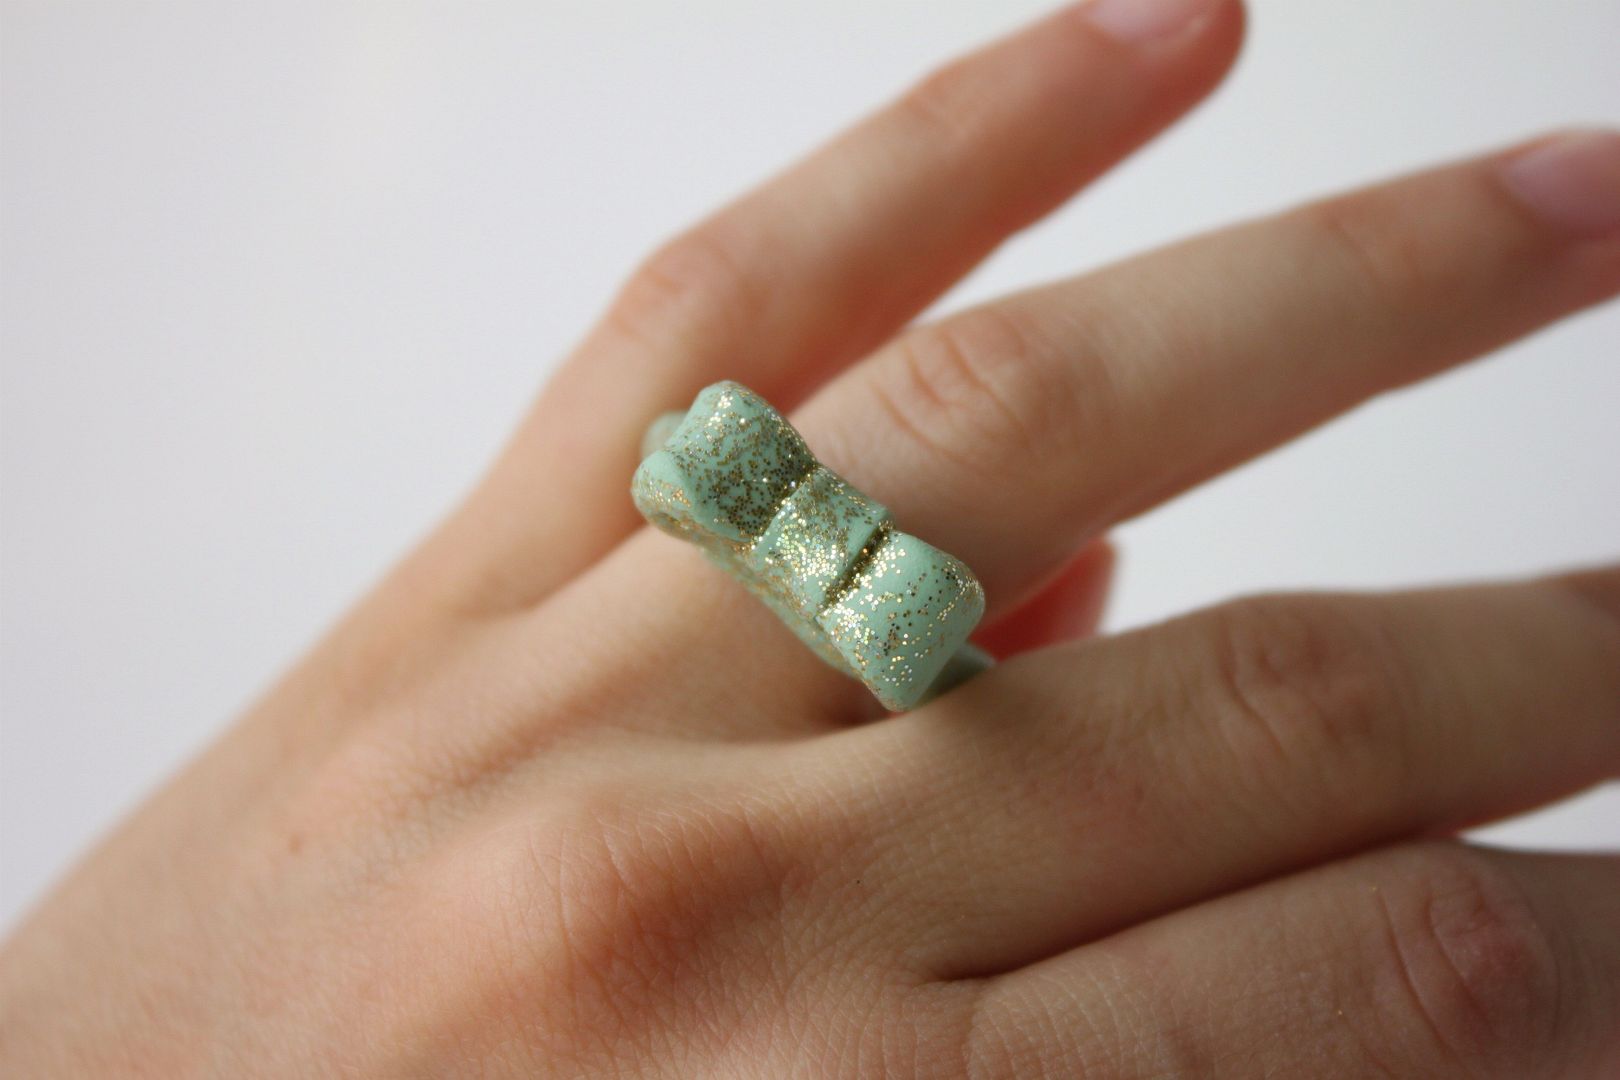 And there you have it!
On a side note: I always thought it was so weird whenever I heard someone reference a hand model..but I actually wish I had a hand model on hand (no pun intended). Hand modeling is no joke and I literally had to take about 40 pictures until I was semi-satisfied that my hand did not look gigantic, manly and hairy.
69 comments:
It looks so great! I love it!
that looks awesome!
This is so cute! I love bows and have had my eye on a few bow rings! This one is the cutest of them all :) And I totally know what you mean about a hand model!! If I ever take pictures of my nails it takes me FOREVER because my hands are just not photogenic!
That looks awesome, will try it myself!! Your hand looks fab ;) xx
haha... so cute! You're so good at these simple and chic crafty things.
love,mongs
mythriftycloset.blogspot.com
I love the bow ring and you hand looks great! It is super hard for me to get a pic of my own hand without it looking really weird!
Love it! I am always wanting a hand model too! I'm pretty sure my hands are the least girly ones out there...which is why you will almost never see them in my tutorials! haha!
hand modeling IS hard!! you need to start selling this stuff on etsy, because i would totally buy it ALL! i don't know if i have the patience to make all of this awesome stuff!
love it!You can never go wrong with glitter!!
Goodness. Where do you get all of your inspiration from?!
So cute...I love it!
you seriously inspire me so much!!! Your jewelry diy's are amazing!
xo Jackie
...livingaftermidnite
SHOP my mark. eBoutique!!
SO Darling!!! Martha's glitter is the best!
LMAO your hand looks lovely!! And this ring is IN-SANE!!! I'll def be making it!! Oh!! I finally made something with polymer clay yesterday!! Post coming soon!! :)
xoxo
Lia
Haha your hand looks lovely! What a great idea! I love that you added the sparkles. I just bought some Martha sparkles to put on my nails after painting them.
- Sarah
http://agirlintransit.blogspot.com/
This looks so fun Linds! What a cute little ring! You are so creative when it comes to clay--I have lots to learn from you. :)
lovely!!! thanks for sharing :)
lovely ring lindsay!! i love the glitter you added. and you are so cute with your hand commentary
Awww, I love bows a great deal. The ring you made is fabulously amazing. Now that I saw it, I want one badly *tear*
:)
that is seriously so cute!!! i love it! and the mint color is so cute!!
♥ allister bee blog
this is so very cute! i love the little bow ring. the color is adorable and it's perfect with a little glitter!!!
spinning-threads.blogspot.com
it turned out perfect :)
How adorable is that? I love the sparkles...such a great touch! :)
This came out so well.. fabulous job!
This is one of the cutest DIYs I have seen in weeks. The ring looks beautiful!
You are SO creative!
i love anything with a lil bow and glitter~! too cute girly~
love the colors of turquoise and gold! and it seems so simple to make. :)
lovely.
xo
Talia
So so cute! Love the mint color, bow, and glitter! Adorable!!
Thanks for letting me know about this super easy tutorial! I will make a note to feature it on my blog in the future!
I never liked plasticine work when I was little but I think I should try polymer clay some time.
That is so cute! I have stubby fingers and when I got engaged and my Mom wanted to take a bunch of pictures of my ring I had to stop her.
this is such a fun idea. love it! and your hands look great haha I always have a hard time taking pictures of my hands too
that is oh so cute- I love the spearmint color too!
Love this idea, your ring turned out super cute! Thanks for sharing!
very kate spade, i can't wait to.... move back to the US and be able to craft, hey only 2-3 more years~
Super cute. I've been crushing on bows lately, too. They bring out the girlie-girl in me. I couldn't agree more with ya on the hand modeling. Taking pictures of crafts and products for my shop are a cinch but when it comes to photographing my darn hand it is a disaster!
Hey Lindsay,
Whoa. I love what you can do with clay! I'm a bow fan myself. :)
If you're looking for fashion blogs, my fave is http://kendieveryday.blogspot.com/. She's approachable and makes thrift finds look like J.Crew.
:) Jen
That ring is just adorable! I've always loved jazzing up polymer clay by adding glitter and pigment powder to it.
For the record, your hands look just fine -- not hairy, not gigantic, and not manly! I understand your concern, though. I know I'll have the same worries when I do my first tutorial (which is on hold because of paper cuts).
Sooo pretty!! And i know what you mean about hand modelling, mine ALWAYS look like granny hands it seems - something i'd never even considered before :)
Sadie x
That is adorable Lindsay! I think you should aim for an electronic book of polymer clay DIY's. Not joking! You have so many fun ideas!
This is so freaking' adorable, Lindsay!!! I want to make these for my younger cousins!!! xoxoxo brynn
Too cute! Love me some glitter! And I'm so impressed that you're opening a shops, seriously, how do you find the time??
P.S. Your hand looks lovely :)
That is so cute!
xo,
Sarah
How cute is that ring!
xo
PRETTYYYYYYYYY>>!!!!!
WE NEED MORE TUTORIALS!!!!
( what do you think of using Air-dry clay???)
I can't find polymer clay anywhere in my place!!
so i bought some air dry clay( inspired by all ur clay crafts)!!
only prob with it is it breaks up after drying!!!
San
please use some air dry clay nd do some tutorials plsssss......
And more banglessss !!!
oh my! what a cute idea. :) And I think your hand is perfectly lovely.
Thanks for your sweet comment and for stopping over! :) I love this DIY! Too fun :) New follower!
wow that is amazing!
Beyond words CUTE!
Super cute ring! I totally agree...it is so hard to take pictures of your own hand that look good. I kept trying to take a pic of my engagement ring and my hand looked horrible...luckily I have a photographer friend and she hooked me up but before her I was like MAN does my hand really look that bad..LOL
worldaccordingtoshia.blogspot.com
♥ Shia
So cute and clever. My daughter will want one, then all her friends. I might start a sweatshop...and I owe it all to your brilliant idea!
Thanks for visiting High Styling. I'm glad I found your blog! xo
That is totally cute! I am impressed with your skill with clay.
And I NEVER photograph my hands. You are brave!
Thanks for stopping by my blog earlier. I'm a new follower!
Oh Lindsay this is so darling!! Thats it. This is my first polymer one I'm going to give a go :) I love it so so so much. Thank you so much for sharing. I hope I end up being half as talented as you when I do it. p.s I hear you on the hand models! I do nails when / if I ever have spare time and its soooo hard capturing them looking good in one shot.
Anna xo
http://lifesshinyprettythings.blogspot.com/
what a great little DIY! & so simple! thanks for sharing!
Lindsay!!!! This sooooooo cute. I am dying. I want one in every color. Too bad I'm not crafty enough to make one.
What a cute idea!
so cute!!! love it!!
http://www.treschicmama.com
In love!
♥Jazmin
oh totally, taking pics of my hands is the worst!!
Your hand is beautiful, your ring is so adorable and your brain is overflowing with good-idea-ness.
Great tutorial! i like it, thanks for sharing.
I clicked through to your blog from Nat's (I Heart This Blog). This might possibly be the cutest thing I've seen today. I'm loving gold glitter with pastel tones and bows these days... Will give this ring a try. Thank you for the tutorial.
Van @ The Clothes We Wear // Wearing Motherhood with Style
That's so adorable!!
This is so cute! And I know EXACTLY how you feel - I have terrible hands! I actually laughed out loud at the end of reading this because my hands always look hairy and manly! hahaha
I love all your Clay tutorials!!
I'm SO excited to try this!!! Thanks for the post
this is so cool!! might have to be my next project :)
I saw this and decided to try it. It was very easy and very cute until I baked it. I followed the directions at the end of the post but it came out burnt. I don't really know what went wrong but my first guess would be that you didn't use sculpey like I did. Next time I will bake it for a shorter amount of time. Other than that I love the tutorial!
Does the glitter come off on your hand after you wear the ring?
Post a Comment