 Sometimes when I am feeling a little uninspired a trip down the kids craft aisle at Michaels can do the trick.
I spotted these fusion beads and they brought back tons of memories from when I was a kid. I used to make all kinds of little iron designs with them. I bought them not having a clue what I was going to do with them. I tend to buy things hoping an idea will just pop in my head. This method of buying things and them not having a purpose is causing my craft cupboard (aka kitchen cupboard) to quickly fill up.
Half the time my little ideas are major flops but sometimes they actually turn out. This was so much fun to make and the possibilities of designs are endless.
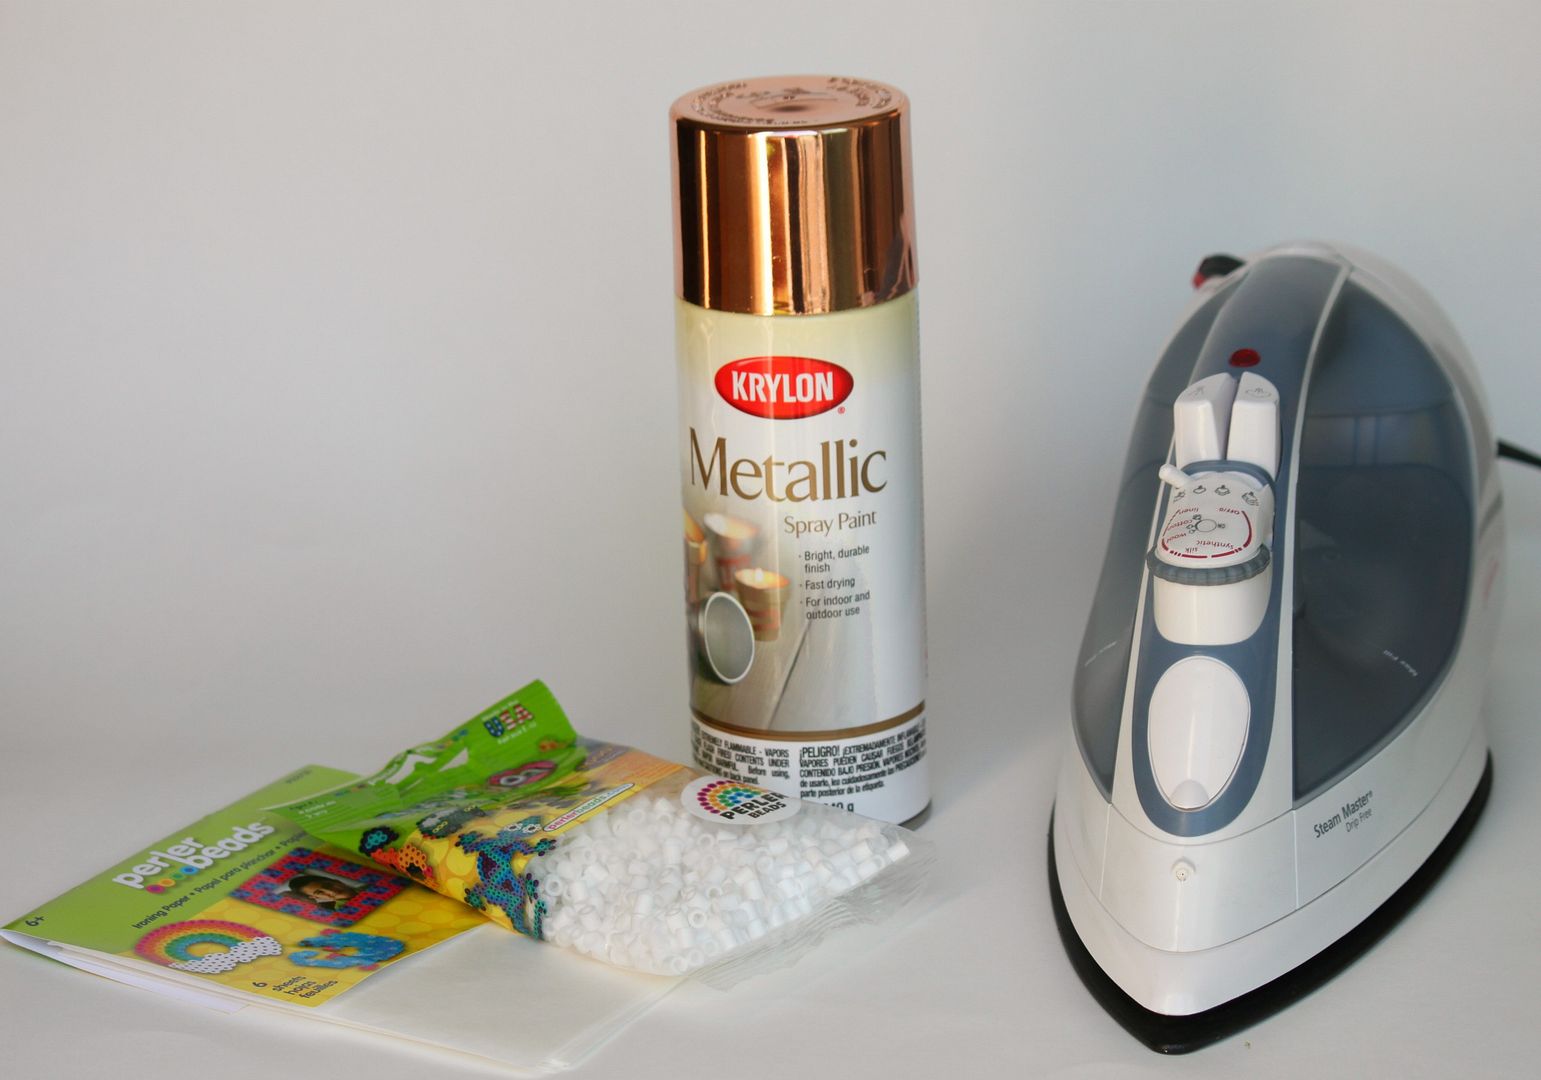
What you will need:
- A package of fusion beads. You can find these at any craft store.
- Ironing paper. You can also find this at a craft store.
- Spray paint. I chose Metallic. I am really diggin this look right now.
- An iron
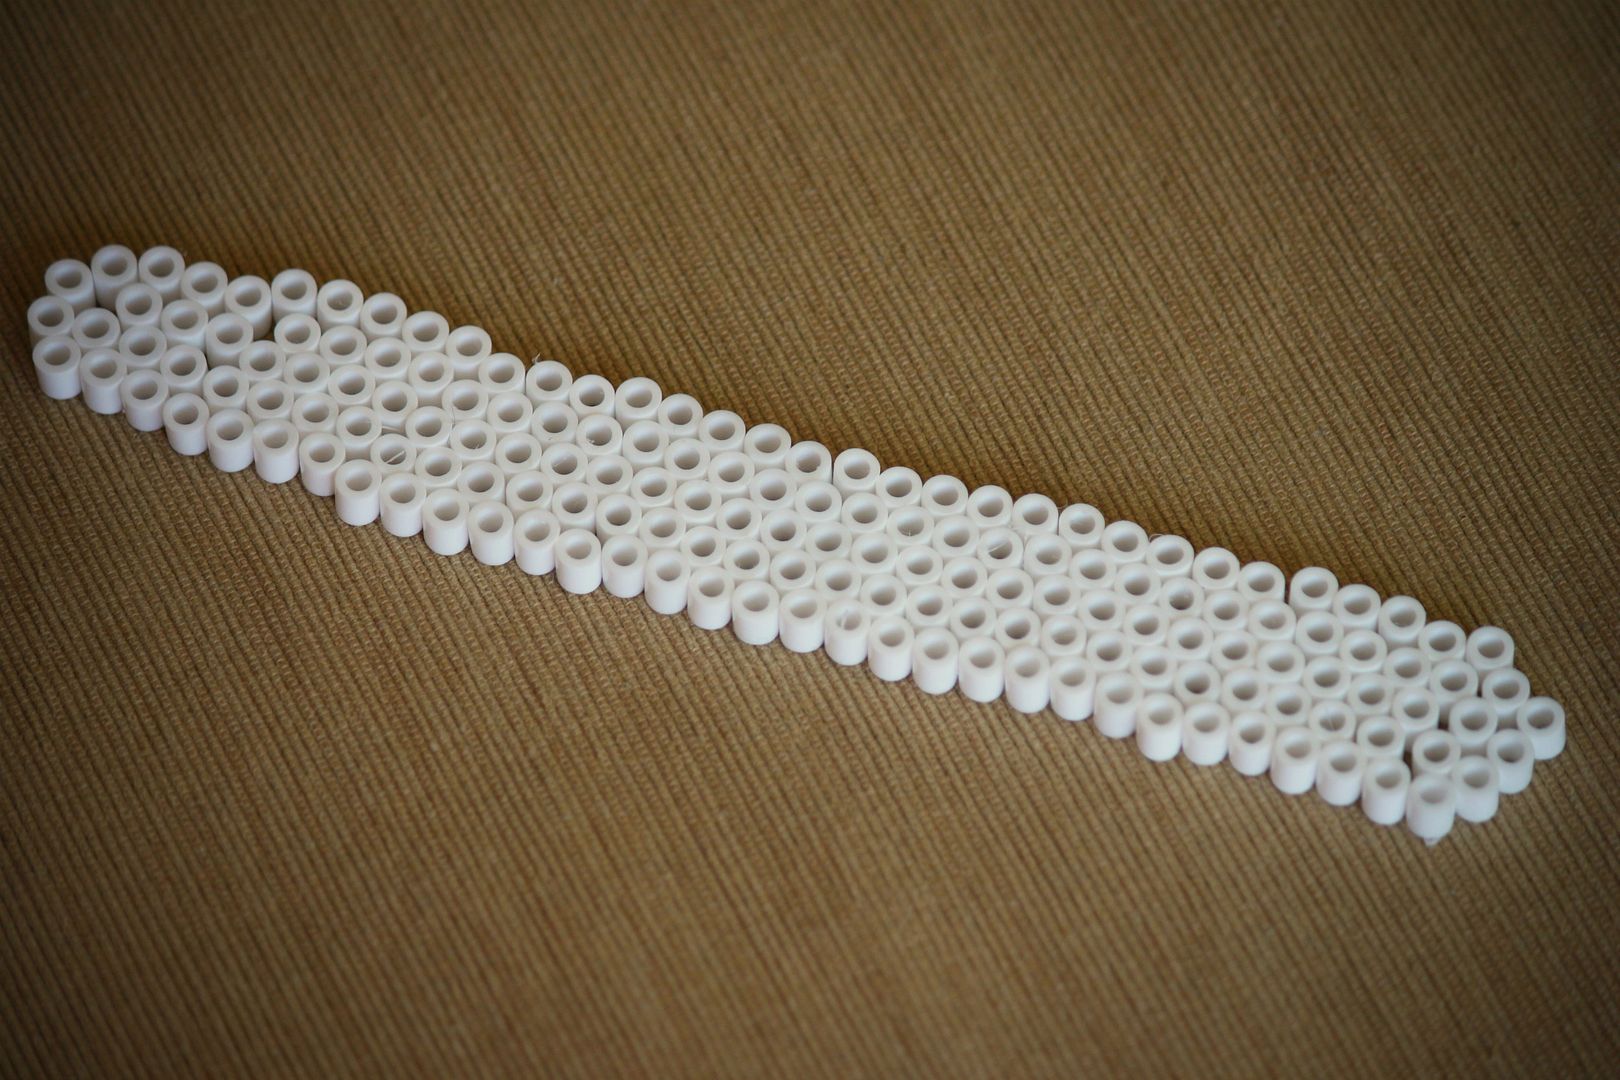 Lay out your fusion beads face up and form them into the shape of a long cuff. My wrist measures 6 inches so I made the length of the cuff to be about 7 inches.
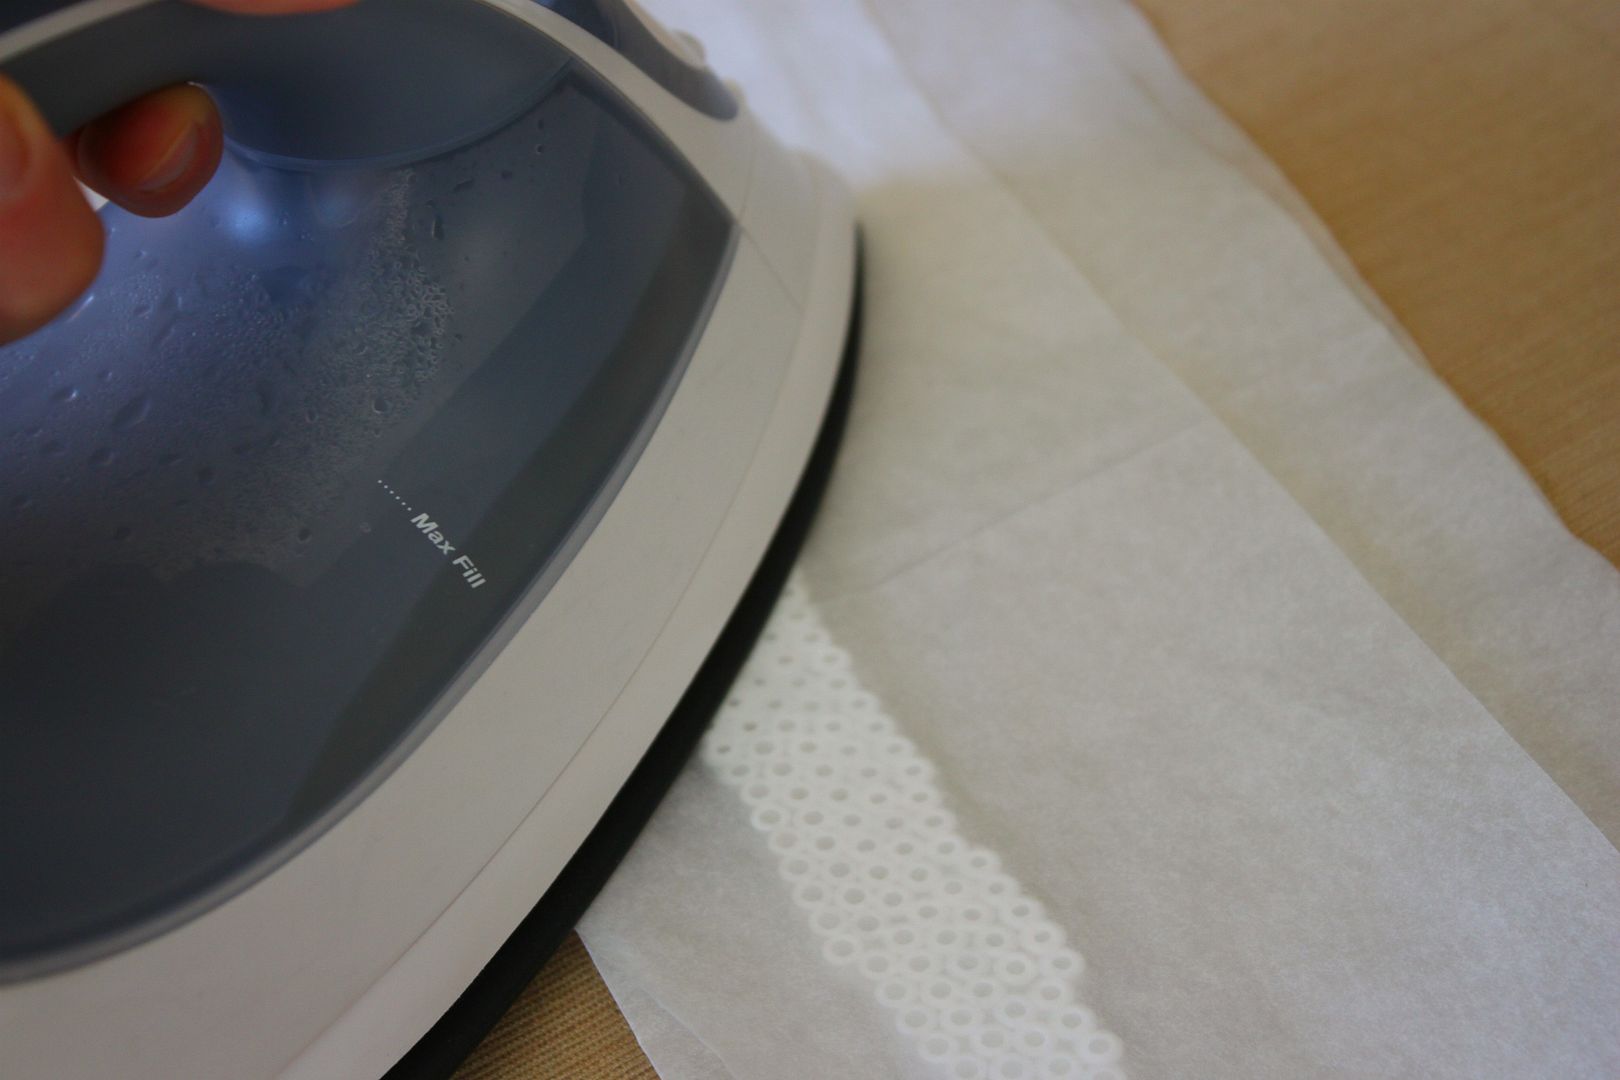 Place the ironing paper on top of your beads. Set the iron on high and quickly iron your piece moving up and down evenly until they all start to melt and mush together.
Once you have done the first side, flip it over and place another piece of iron paper on top and do the same thing.
 Once you have finished ironing the beads and they are all fused together you need to work quickly and mold the piece into a cuff shape. Since my finger pads are all worn off from glue and other crafts I didn't feel much but if you have soft little fingers be careful! Once the beads have cooled the piece is set and the shape will stay the way you molded it.
Spray paint it.
 This is the back side of the cuff.
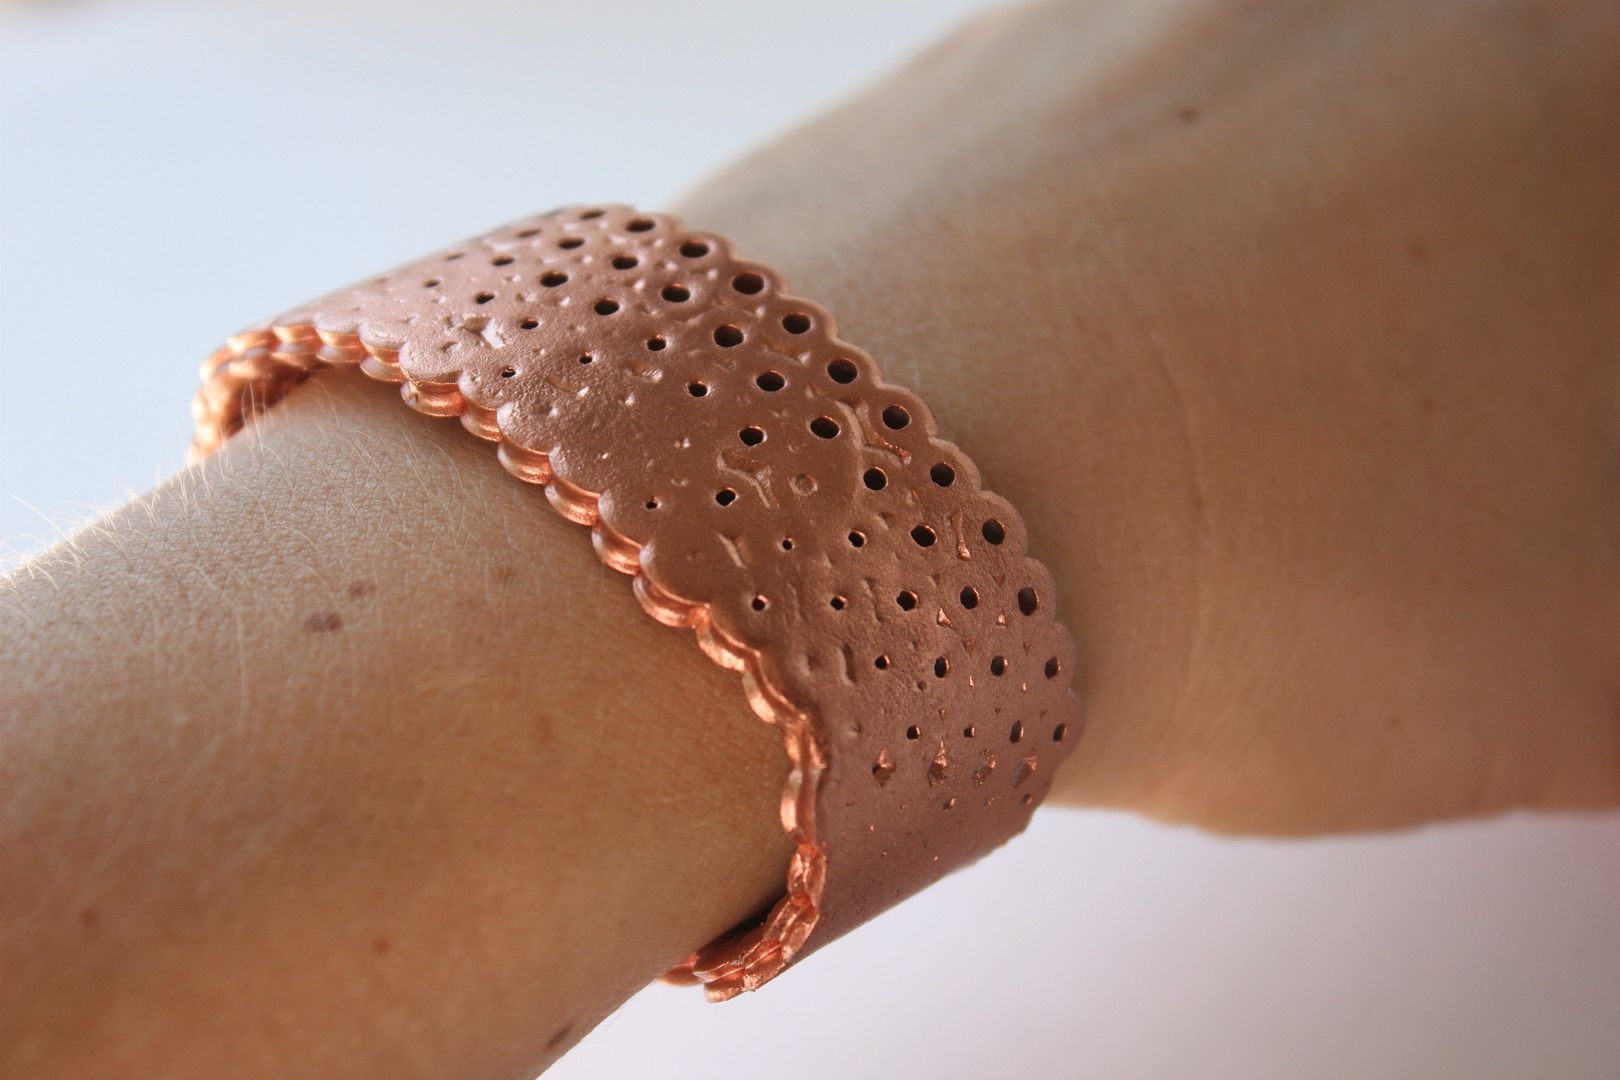 And there you have it!
When my husband got home from work yesterday he had no idea what this was (men) so to my horror he began slowly opening it and bending it back and fourth...after my shock wore off that he was about to destroy my masterpiece, I jumped through the air in slow motion (okay not really) and grabbed it to make sure it was still okay. It was fine! So to answer your question in advance about if it is durable, my answer is YES.
55 comments:
I loved those fusion beads when I was a kid. I would never have thought to use them to make jewelry but your cuff looks really good! I definitely like the metallic look :)
That's too cute Lindsay. Men, huh? When will they ever learn to leave your fusion bead jewellry alone? LOL You're amazing!
Anne xx
Its awesome! So WHEN are you opening and etsy shop so I can start Christmas Shopping!
I always love your DIYs... You are so creative!
Those beads are so much fun!! We have a big bucket of them in our craft closet but I've never thought of using them for my own project...great idea!!
Creative idea! And it actually looks super cute! I love all of your DIY's, they are some of the most favorite things that you post!
wow I love the bracelet. Excellent job on it. Glad you DL didn't break it. :) Thanks for stopping by. :)
Haha! So glad you saved it! Cause it's awesome!! Seriously love it!
That's a great idea! I love the metallic finish, and I don't think anyone would guess it started out at fusion beads.
That is SOOOOO cool! It looks like one of those bike chain bracelets. We have TONS of fusion beads lying around (most in some semblance of a pattern that will never get ironed).
this is so clever, you're a genius! I like the metallic spray, gonna get myself one for craft use.
love,mongs
mythriftycloset.blogspot.com
LOL - love the leaping visual.
The kids and I were just playing with these the other day. The bracelet is much cuter than the car and airplane we made. :)
Those fusion beads are rad. I remember playing with them when I was little...who knew that they could come in handy later too?
xo
Awesome DIY!
SO stinkin cute. my daughter will love this!!!
dang. a trip to hobby lobby is in order today.
CAW
You are just so creative!! I would've never thought of this.
All I have to say is you are one clever cookie! I see those things at Michaels all the time and would have never thought of making come cool, hip bracelet out of it. You totally rocked this one:)
HA! This is incredible. What an brilliant idea, Lindsay! :)
I've never heard of these before. Love the metallic look!
AMAZING, I'm trying it THIS weekend! The funny thing is I've done this before (only in disney shapes, babysitting as a teen) who would've thought it could be so cute! xoxox
Great DIY! Thanks for sharing!
xo, chrissy
The Perfect Palette
Fabulous idea! ♥
What a great idea! Love your blog, I am a new reader and so excited to try some of you DIY ideas.
-Whitney @ cwdavenport.blogspot.com
wow, this is a really really REALLY creative idea. Go you!
- Sarah
http://agirlintransit.blogspot.com
It's a great idea and my fingers are Teflon coated so I should be ok!
X
What a fun idea! I love the gold too!
This is awesome!
http://topoosesmooses.blogspot.com/
My preschool students LOVE these beads. It's so funny to see them put to an adult use. What a great idea!
Haha, I'm not sure what I loved more the bracelet or the story about your husband.
Oh my goodness, I remember crafting with those when I was little! Who knew you could make more that coasters out of them :) love it!
ohhh my, what a flashback! those little iron-y beads! i had no idea there was actually a name for them. and i love how your bracelet turned out! ha and i'm glad it withstood the husband test!
Ah Lindsay this was such an awesome idea! I used to make keychains out of those when I was little (what a little kid needed a keychain for, I have no idea..)! And good to hear they're boyfriend-proof as well - my boyfriend would be sure to play with it! :)
-j
sorelle in style
This is super cute! Love this DIY :)
Genius!
Hahaha, I love that your hubby didn't know what it was so started to pull at it! Glad it survived, and what a great idea. It'd be great for vacations too as I imagine it'd be super light!
Sadie x
http://whatsadiedid.blogspot.com/
haha, i'm glad i read the last paragraph or i would have forever wondered how easy it was to break
great idea, i used to make tons of these on rainy or sick days... we used them as coasters around to house for awhile to showcase my talent, lol
AWESOME!!!!! I need this in my life.
so cute! I love all your crafts!
Very clever... love it!! Looks kind of like deconstructed metal or something... fuse beads, how ingenious!
Lindsay I love this!!! It's so cute! Definitely want to recreate it someday!
I so enjoyed reading this post!!You are so funny!! And very talented!! Thank you for sharing this wonderful idea!! I must buy ironing paper from some online store because I really can't find it here.
Have a great weekend, honey!! xoxoxo
Clever little idea :) Visiting from Boost My Blog Friday. x
Cute! I never have seen that one. i love Michaels too and Joann'a..I always get the coupons and then try not to go crazy...right now the coupon commotion is going on with joAnns...40 % off practically everything..
Oh my gosh I have that spray paint I got it for coasters and have yet to spray them. I love this soo freaking cute.
amazing! such a great idea :)
Coming by from the Blog Hop! Very cool idea!
I look forward to reading your blog. Please follow back :)
http://onemomsmoxie.blogspot.com
I love this! So cute and fun!
Oh my gosh, soooo cute! I used to make little things with those back when I was younger - I'd design little people or animals! Never something as practical as a bracelet. Love this idea!
I have been very bust melting crayons.
http://thriftywithtriplets.blogspot.com/2011/09/more-melted-crayon-art.html
Might need to start melting these instead.
Finally! I have tons of these beads leftover from when I was a little kid. Now I finally have a reason to keep them. =)
Whoa! Super cool idea.
You know what I just thought of? What if you made a 'setting' out of these beads and then set your faux turquoise stone in it? Double awesome, right? ;)
So cute bracelet! i will try it, thanks for sharing.
I've never heard of iron paper before, but I've always just used parchment paper from the baking aisle for these beads. I never thought of painting them before, and probably would have doubted paint would even stick.
Really cool! thanks for sharing :)
Post a Comment