 I have a bangle obsession...and I have a deep love for polymer clay. I am definitely keeping the polymer clay section at Michaels in business.
I have quite the collection going, which is filling up our kitchen panty pretty quickly. Ian opened the cabinet to get some food goodies last night and told me I should "Probably get organized." What?!! I think the kitchen cabinet is a PERFECT home for all my crafts. Okay maybe not. Anywhoo...
I am going to show you an EASY and inexpensive way to make just about any kind of bangle you want.
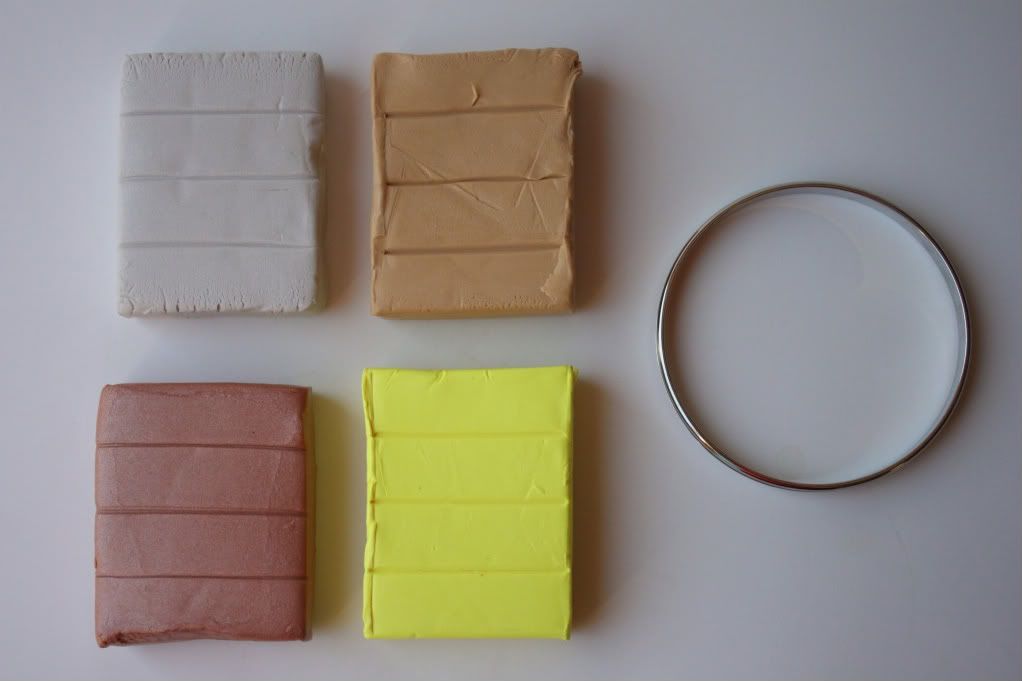
What you need:
- A few different polymer clay colors.
- A bangle. Use this as a guideline to measure and shape the bracelet before baking it.
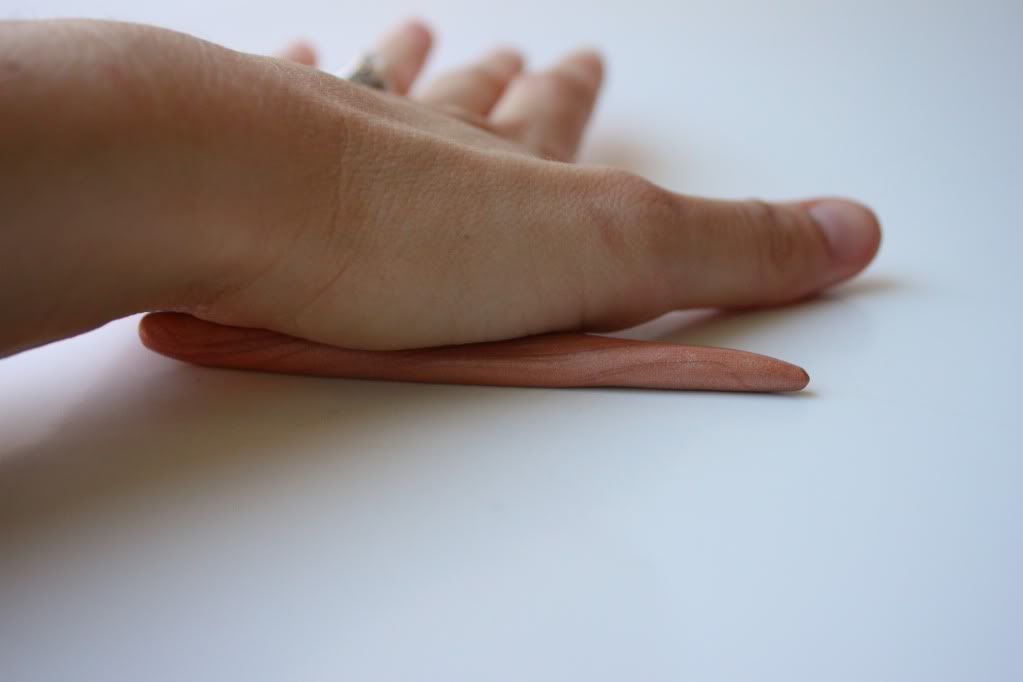
 Using the palm of your hand roll two thin tubes. If you just want to use one color you can.
My hand look a little dry...hello lotion where are you?
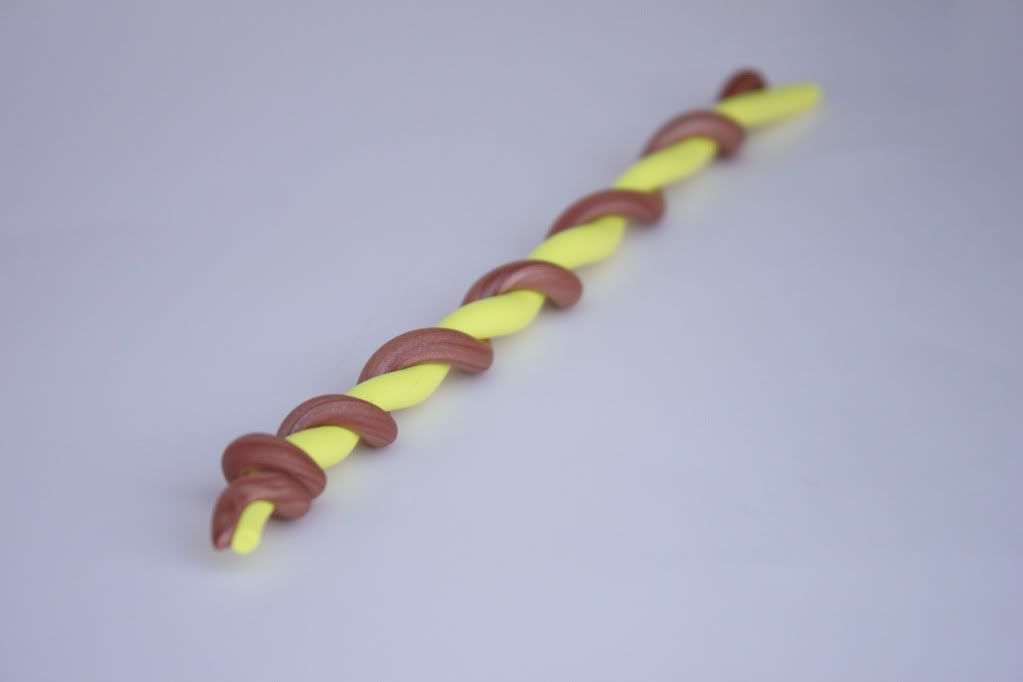 Wrap one color over the other. Roll them together with the palm of your hand to blend the two.
 Using the bangle as a guideline wrap your tube of clay around it tightly. Mush the two ends together and smooth out with your finger.
Remove the guideline bangle and bake your bracelet at 275 degrees for 20 minutes.
 You can make as many as you want!
90 comments:
I am so dense - I never thought of making my own bangles! And I don't think I've done anything with clay since 4th grade so it sounds like a fun project! Yours turned out so pretty! I definitely want to give this a try.
very cool. i admire anyone that can do it herself/himself. great idea!
Such a cool idea!! I've been wanting to start playing with polymer clay... :) These turned out super awesome, they remind me of those old fashioned candy sticks, do you know what I'm talking about? Anyhow, great job Lindsay!!
xoxo
Lia
You just made my day! I adore this.
Great idea! I might have to try this because I bought some weird colored clay and I think it would be perfect for bangles :)
ooo this i would love to attempt! pinning it on pinterest! :) <3 EverRubyGirl.blogspot.com
CUTE! The neon is so bright & lovely! You know how I love a fun bracelet! That clay stuff looks pretty awesome - I'm dying to try it out. And you changed your header I just noticed! Looks nice! (tho I loved your dandelion :))
WHAT!
You made these?
Can we do a giveaway here? I need all of them... puh puh please!
So cool! Have you ever tried adding anything into them? Like glass jewels or sparkles?
Loving the turquoise colored one the bestest. :o)
okay, this is the coolest thing everrrrr!!!I NEVER would have thought of this!!!
How adorable!! You are so creative!!! Love it. Heading over to Eat, Love, Style right now :)
swirlsofhappy.blogspot.com
Lindsay, your creativity is just too cool. I really love how these look! The teal colour is especially bewitching. :)
Ronnie
(p.s. Loving your new banner!)
Whow! That's amazing, great idea! I'll try it :)
martiege.blogspot.com (Martie's DIY)
Thank you, for guest blogging at my blog. It was such a great post. I love these bangles and the colors are amazing.
love these Linds! Amazing! they look edible! like candy canes! yummy
jess
your talent never fails to amaze me, you always make simple things look so fabulous. Well done Lindsay!
love~mongs
mythriftycloset.blogspot.com
I checked out the hemp bangle tutorial before and I LOVED what you did! Looks like I'll have to venture to Michaels like NOW.. ;)
And Lindsay, we've awarded you with the Best Blog award! Check it out on our latest post! :)
-j
sorelle in style
so cute! very good idea. i should try this...
www.fittinginn.blogspot.com
what an awesome DIY! definitely going to have to give it a go! :)
Super cute Lindsay! I pinned it on Pinterest :)
love this idea!
These are GORGEOUS Lindsay!! You are so creative! And you have the best jewelry too :) So funny about the kitchen table - that's how I am too. It's much more fun having my craft supplies on display all over the kitchen than storing them away ;)
Those look AMAZING! I am definitely trying this out! :)
So cute! The possibilities really are endless! So, how do they hold up? Are they delicate? I've never used polymer clay before so I'm clueless.
wow this is such a cute idea!! And it looks so easy too! Awesome!
Notes She Wrote
Fabulous - I love these. They look like sweeties!!
Sadie x
~ http://whatsadiedid.blogspot.com/2011/06/very-first-giveaway.html ~
nice bracelets and interesting blog. i follow you ;)
Those turned out so pretty! Never in a million years did I think homemade clay jewelry would turn out so nice (which is not at all a diss to you, but a diss to myself because I am totally out of the loop when it comes to jewelry) :) Great job!
can't believe how easy those were! i'll be trying those ASAP
This is such a great idea! I can't wait to make some for myself! Thanks Linds!
I'm so so impressed. You are so creative! Adorable bangles :)
Wow! Looks so easy but I'm sure I would mess them up somehow! hehe! Love the brown and yellow together!
What a brilliant idea! I think they look expensive! Love them all together, they're beautiful!
Girl about Town XxX
This is such a great idea. The variations are endless. Thanks for sharing this!
this is such a great idea, thanks for the tutorial, they look awesome!
xo, Grace
Dream-Boating
This is awesome! i love this idea :) You are so creative, lady!!! I will add this to my to-do list! {going to pin this right after i finish this comment!} xoxoxo brynn
These look really great and you make it look so easy to get the blending and smoothing and baking just right!
Oh my gosh, this is GREAT! I love it, they're so beautiful. And unique!
HOW CUTE! Thanks for this!! Totally bookmarking!
I loooooved playing with Sculpey when I was little! You just need a cardboard box (for a house) and everything else you need (furniture, dolls, pets) you can make. But I never thought to use it after childhood. Especially to make such gorgeous jewelry.
These are fabulous!! You are so creative!
Jo-Anna
I love your blog. You rock my creative world!
I am sure to pick up some polymer clay next time I'm at the hobby store. This looks like an awesome idea that I can't wait to try it. Thanks for sharing. :-)
Hi! Ummm! LOVE! I am so pinning this!I am a new follower!I would love it if you stopped by blog, take a look around and if you like what you see, follow me back! Thanks!
Have a great holiday!
Kirsten
www.mushkiloves.blogspot.com
sweets! this is such an amazing diy!! love!! so creative and such a great way to add a pop of color for summer!
take care, aimee
diy blog: swellmayde
Those are so cute and awesome. I wanna try!!!
I absolutely love these and will be off to the art shop to buy some clay this afternoon. They would make perfect Christmas gifts. Thank you.
Wow, are you kidding me?! These are amazing! I am so going to do this for both Devon and myself. Thank you so much for the tip. Happy to have found your blog, thanks to your sweet comment:)
I really think I HAVE to try this...
This post totally made my day today. I ran over to AC Moore picked up some clay and I've been baking away for an hour. Totally love this idea!!
Love! I'm a new fan. Can't wait to make some and show them off!
everydayrhinestones.blogspot.com
Just picked up some clay and beginning my bangle making process now! Hooray for a great idea. Thank you!
GREAT IDEA! I just re-posted on my blog - so glad I found yours! Too good not to share!
{mommy chic} design. style. kids. life.
i'm making these this weekend for sure! great idea, and simple too!
check out my new bangles! thanks again for the easy project. perfect for a saturday afternoon!
http://taylormorgan83.blogspot.com/2011/07/bangle-bangle-bangle.html
I've had such fun making these and am sending out batches of them in the mail today :)
http://maddisonhamil.blogspot.com/2011/07/diy-clay-bangles.html
These are so, so, so great! I'm love making jewelry, so I'll have to add these to my list :)
*"I love", not "I'm love" making jewelry. Sorry, that would have bugged me to not address it :)
As a fellow DIY junkie, I LOVE this project! Love :)
These are amazing and look so simple to make. Definitely going to try to make them! Thanks for the idea!
OMG this is awesome. i have polymer clay sitting around and i will def do this :)
SO cool...you have inspired me to try my hand at this! :) I am a jewelry lover!
~Lisa@OrganizedChaos
I think these are really cute but I have a practice question--how easily do these break?
They are super durable once they are baked
Hi there! I tried making these bangles tonight but they all burned pretty badly and therefore didn't have the same sheen as yours. What did you bake yours on? On some websites it says a cookie sheet, others say use a ceramic tile. Did you coat these with clear polish or mod podge?
Aurora- I baked mine on a flat cookie sheet. I did not coat them with anything..I kind of liked the matte finish. I baked mine (3 at a time) for 25 min at 275 degrees. Hope that helps!
Oh it sure does, thanks so much! I'll have to give it a couple more tries :)
i heart these bangles! i will be making these asap!
love this idea! can't wait to try it! :) lisa
Hi, are these suppose to be kind of soft and bendy? I made some and was very surprised at how pliable they are. Yours look so great and shiny and hard. hmmm
Very nice. Where did you get your bracelet form?
Do you have a photo of this step, "Wrap one color over the other. Roll them together with the palm of your hand to blend the two." I am not sure I completely understand, any help would be AWESOME! thanks!
can i use modeling clay to do this and use my oven to bake it? how many cc?
Awesome! We've been working on some bracelets to add to our other poly clay creations in our Etsy shop. Hadn't thought about wrapping the colors like this. I've got some ideas and color combos in mind already
Preciosas y que fácil parece...habrá que intentarlo.
How do you make the bracelets shiny after you bake them like in the last picutre? Is it the type of polymer clay that you used?
This is a wonderful idea.
My hands are large, and with arthritis issues,
store-bought bracelets just do not fit.
With this idea, I might find a ring that will fit
and can add the clay and will finally be able to
wear bangles.
Thank you thank you thank you
Theses are so amazing, I'm thinking of making them for my friends for Christmas, however I think the clay contains PVC from what I read online. D
Let me just start out by saying...I absolutely love your blog!!! Its the first time I'm going through it and I have a huge list of materials to get (thanks for making me spend more money!!! but at least it'll be cheaper than buying look a likes :)) I can't wait to get started!! I'm so glad its Thursday so I can spend my weekend doing these fun projects!! I do have a question, I hope it isn't dumb. After the clay is cooked, does is become so hard that you cannot bend them at all? How do you know what length you need so it can slip over your hand? Thank you so much, you're such an inspiration!!
HI
love polymer clay but but did not known where and how to start you gave me the inspiration
thank you
LOVE... Approx how much clay do you need per bangle?... ie: if a solid color, as I know that will change things if you blend... just wanna know how much I need to put on my shopping list!!
Hi Kathy, I just made some using premo brand which comes in a 2oz little block that has 4 sections scored, I used only one section. I ended up having a bit extra because I have a small wrist. I used the extra to make a ring. Hope this helps.
What kind of clay did you use? I have Sculpey but I'm worried it would break when I put it on :/
using the guide to bend the clay is a great idea, however when you bake the bangles doesn't it flatten on the side its laid on the baking sheet? ... how do you prevent that from happening?
I will definitely give it a try next weekend, I have a couple of fantastic earrings for this DIY.
I Love It! Question, where can I buy the bangles that would be used for a guide? I'd like to get them online? Thank you!
Post a Comment