Skin Care Tip of the Week *Lavender and Coconut Milk Bath Soak*

Monday, April 30, 2012

This week's skin care diy is one of my personal favorites! It is relaxing, smells amazing and makes you feel like you are getting a luxurious spa treatment in the comfort of your own home.

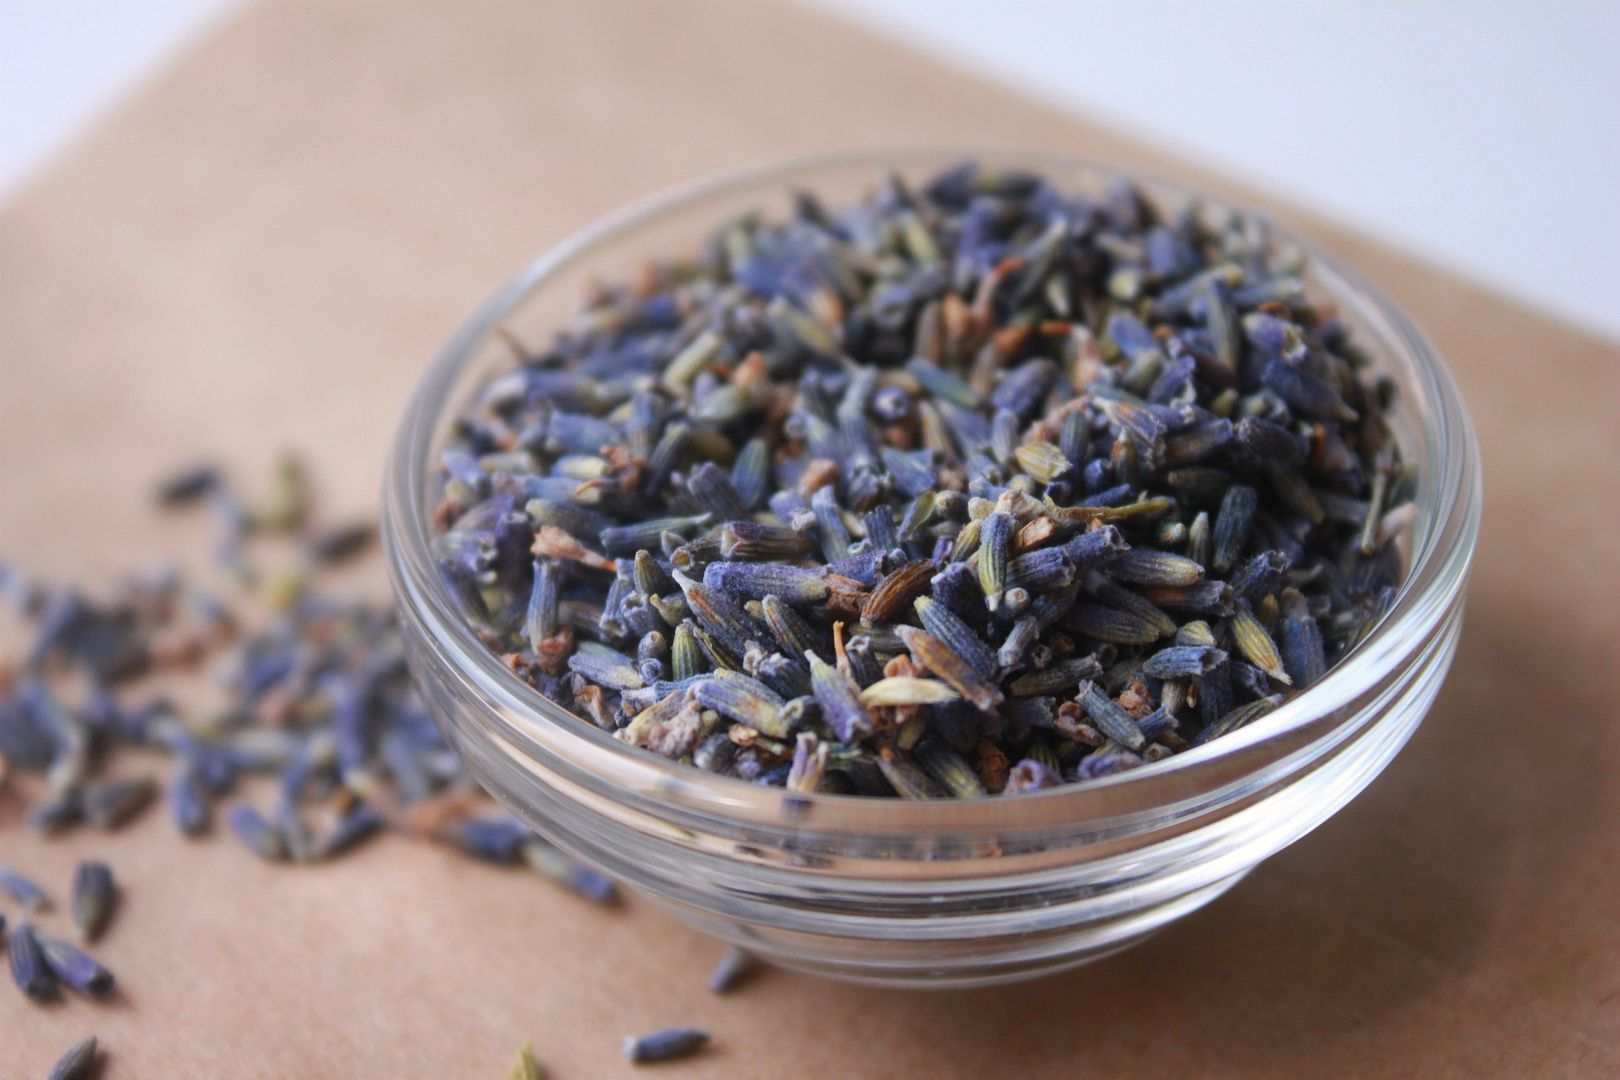
Dried lavender flowers are known to help with nervous exhaustion, headaches and will help your body and mind relax.

Coconut milk has a natural ability to calm and hydrate your skin, leaving it feeling baby soft.

Together these ingredients make magic...in my opinion :)

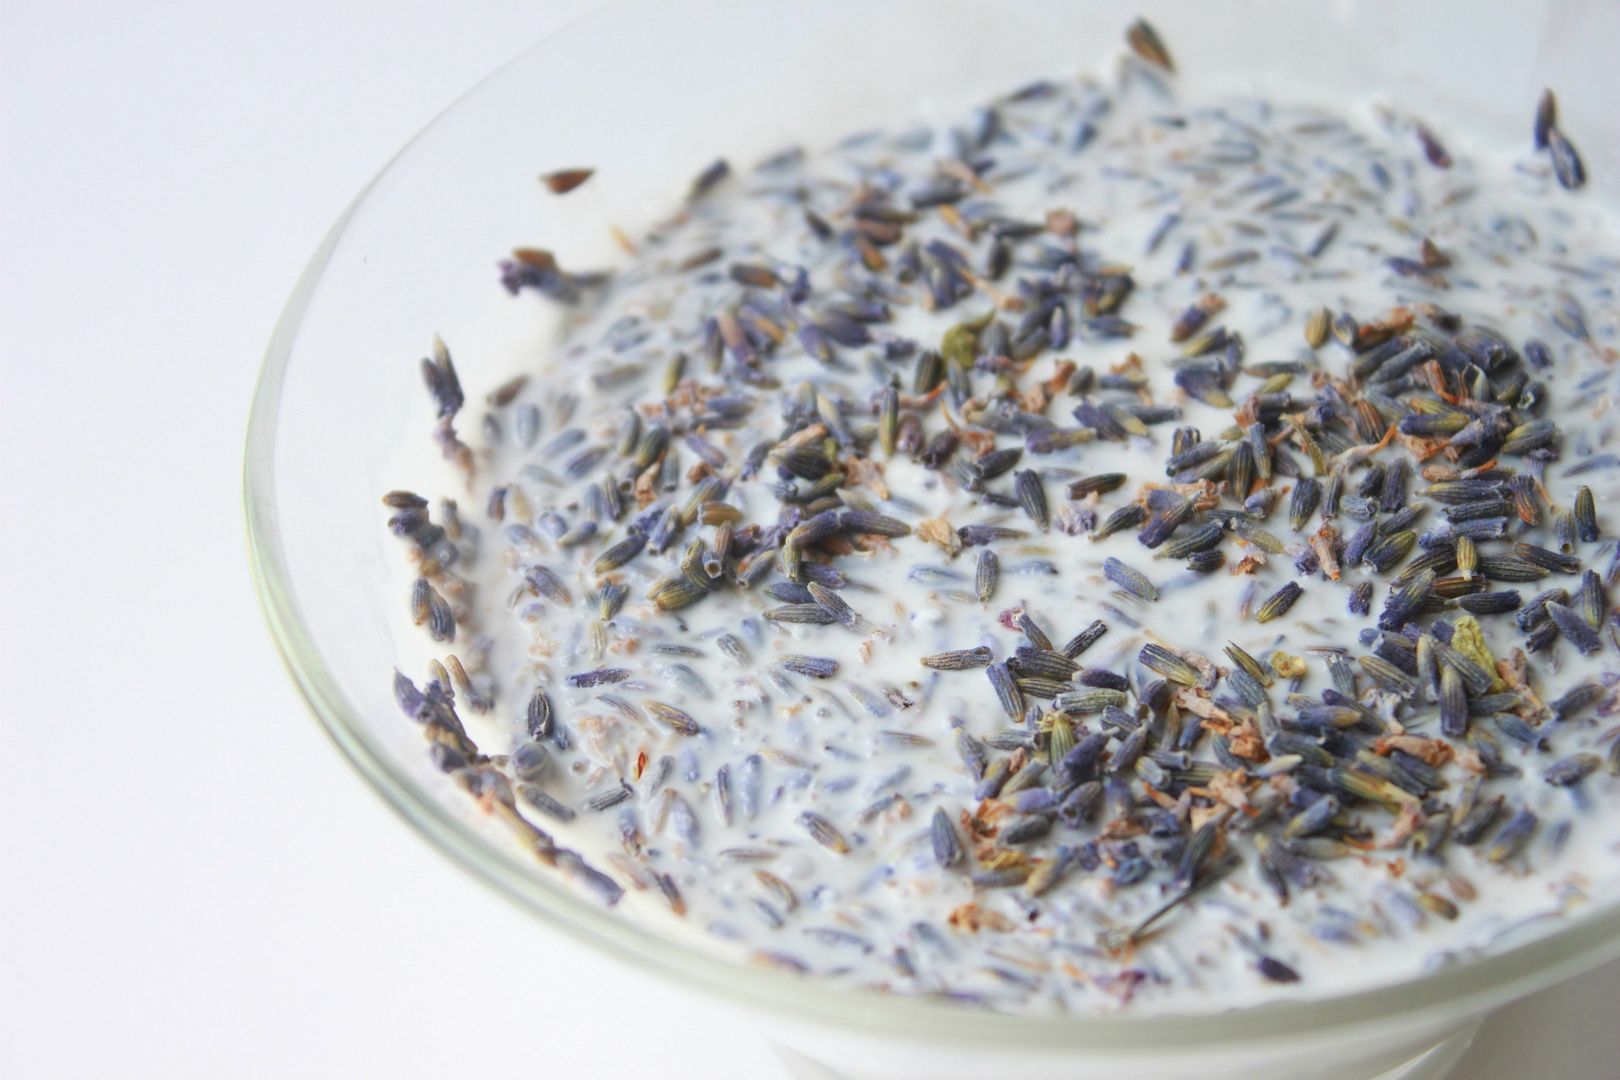
Lavender and Coconut Milk Bath Soak:
  • 1/2 cup of dried lavender flowers. You find them in bulk at your local health food store. You can also purchase them here.
  • 2 cans of full fat organic coconut milk.

Directions:

  1. Draw a warm bath and slowly add the two cans of coconut milk and the dried lavender.
  2. Soak for as long as you like. The longer you soak the softer and more refreshed your skin will feel after.
Try to relax and breath in the invigorating aroma of the lavender and coconut.

Enjoy...

On a side note: I have been receiving more skin care question e-mails than I am able to respond to. If you do have a skin care question/concern that I have not yet covered PLEASE feel free to e-mail me and I will be happy to consider it for a future post. If you are experiencing severe acne or other issues my best advice is to make an appointment with an experienced and qualified esthetician so you can get a complete skin analysis in person.

Things that make me say yeay

Friday, April 27, 2012

The way the sky looks after it rains.

Sweet Mint chapstick from EOS. This stuff is SO yummy.

Homemade low carb pizza night. Recipe here.

Getting motivated to get in the best shape of my life after the baby is here! I only have 6 weeks left...so excited about this.

Colorful flowers at the farmers market.

Have a wonderful weekend!


Congrats to Erica Simpson you are the winner of the Society6 giveaway! Please e-mail me at lindsay.kujawa@yahoo.com
so I know where to send your gift card.

Baked Thyme Onion Rings

Wednesday, April 25, 2012

I LOVE onion rings. Unfortunately, onion rings that you typically indulge in at a restaurant are usually fried and loaded with carbs and calories, making them a not so healthy option when choosing an appetizer. I was having a major onion ring craving the other day but wanted to make them diabetic and carb friendly. Since I have been on a major almond meal kick lately, I decided to make them using that and I was sooo happy with how they turned out!

What you will need:
  • 2 large onions (I used sweet onions)
  • 2 tbs of finely chopped thyme
  • 1 1/2 cup of almond meal
  • 1/2 tsp of salt
  • 1/2 tsp of pepper
  • 1/2 tsp of garlic powder
  • 2 eggs

Directions:

  1. Preheat oven to 400 degrees.
  2. Wash and slice your onion into rings. Remove that sticky outer layer.
  3. Combine all of the dry ingredients together in a bowl.
  4. Mix together the two eggs in a separate bowl.
  5. Dip each onion ring in the egg mixture first and then in the "flour" mixture.
  6. Place on a lined baking sheet (makes for easy cleanup).
  7. Bake for 20-25 minutes. Turn over the onion rings at the halfway mark. When they are nice and golden take them out.
These are seriously amazing! The thyme adds the perfect amount of unique flavoring and the fact that they are baked and low carb (less than 1 gram of effective carb per onion ring) makes them a wonderfully crunchy and healthy snack that will curb any salty craving that you may be having.

DIY Gold Dipped Seashell Necklace

Tuesday, April 24, 2012

I have been really inspired by nature and outdoor elements lately (see coral inspired bangles here). Plus, I have this GIANT box of pointy seashells (is there a name for these?) that is just taking up space. This might be one of the easiest DIYs ever...but sometimes the easy ones (see this basic polymer clay bead tutorial here) turn out to be some of my most favorite.

What you will need:
  • A seashell. You can buy them at Hobby Lobby if you don't have an extra one hanging around.
  • Cotton cord for your necklace
  • Metallic or gold paint
  • A power drill (not shown)
Drill a small hole in the top of your shell.

Dip the end of your seashell into the paint. Let it dry.

Once the gold paint has dried, you are finished!

Our Spring Tradition

Monday, April 23, 2012

In honor of Earth Day, which was yesterday I wanted to share our family's little way of staying green.

Ian and I started a tradition last year where each spring we would re-plant or re-seed our garden. Keeping what we liked from the year before and ditching what we did not (hello little puny carrots that tasted like a bitter version of a real carrot). This year we decided to go with an entire bed of heirloom tomatoes (my favorite) and a second bed with a few different lettuce varieties and cucumbers.

My current view. Hello baby Ronin. I admit I was not much help with the whole gardening process--but I was a great water and snack getter :)

Ian checking on our compost pile that we used as a fertilizer for our garden. Does any one else have a compost pile? It is great! You can put your eggshells, egg cartoons, coffee grinds, biodegradable paper towels and so much more in there! It is not the prettiest of things but it is the best kind of nutrients you can give your plants.

Planting our heirloom tomatoes. I can not wait for these to take over and have fresh tomatoes for months to come.

$50 Giftcard Giveaway To Society6!

Friday, April 20, 2012


Today's giveaway is hosted by Society6, which is an awesome shop that carries the coolest iPhone cases, T-shirts, art prints and more! All of the artwork you see on Society6 is created by artists from around the world. Society6 uses the highest quality materials, so you can be sure what you are getting is only the best!

Society6 is giving away a $50 gift card to one lucky reader. You can use it towards whatever you like in their shop. So even if you don't have an iPhone there are still lots of options!

How you can win:

*You must be a follower of Delighted Momma through GFC in order to enter*
  • Visit Society6 and take a look around. Come back and leave a comment letting me know what you love.

Extra Entries: (please leave an additional comment for each)

  • Pin your favorite product from Society6 onto Pinterest. Please leave the link.
  • Like Delighted Momma on Facebook
  • Mention giveaway on Facebook
  • Tweet about giveaway. Please tag with @delightedmomma

Good luck! A winner will be chosen at random and announced April 27th.

Swiss Chard Veggie Wraps

Wednesday, April 18, 2012

A few weeks ago Ian and I were at my Dad's for a BBQ and my step mom made delicious veggie wraps with swiss chard. They were unbelievably good. I've had lettuce wraps a million ways but wrapping them in swiss chard was a whole new thing for me. I decided to re-create them this week for dinner and they are now a new family favorite.

Swiss chard is crunchy, full of flavor and is one of the most nutritious vegetables around, making these veggie wraps not only filling but so good for you. The dipping sauce is also a very important component (in my opinion) when eating veggie wraps so I am sharing the one I made to go with these.

What you will need:
  • Swiss chard
  • Sprouts
  • Celery
  • Cucumbers
  • Carrots
  • Avocado

Mustard Dill Dipping Sauce:

  • 3/4 cup nonfat Greek yogurt
  • 2 tbs of dill mustard. I used aioli garlic mustard sauce from Trader Joes.
  • 1 tbs of Braggs Liquid Aminos (a healthy soy sauce alternative). If you can not find this low sodium soy sauce will work too.
  • 2 tbs of fresh squeezed lemon

Slice and grate your veggies.

Place your veggies on the swiss chard. I cut each large leaf in half since they were so big. You can either add your dipping sauce on top of all the veggies and then wrap, or dip your veggie wrap in the sauce after you wrap it.

Enjoy!


Review- Découverte Under Eye Repair Serum

Tuesday, April 17, 2012

Reviews are rare on my blog because unless I am truly excited to share something with you I wont bother with a review. Why waste your time and mine right?

When Victoria the CEO of La Bella Figura emailed me about her eco-luxe skincare line my interest was instantly peaked. She let me know that their #1 best selling product was the Decouverte Under Eye Repair Serum.

Being the nosy esthetician that I am, I immediately hopped on over to their site to search for the ingredients and to see what it was all about before committing. I was blown away! Every ingredient listed was top notch.

As a Mom with a potty training toddler, pregnancy insomnia and another baby on the way in just 7 weeks...lets just say that my under eye area looks a little pathetic at times. I don't have dark circles but sometimes I need a little extra boost that helps me fake that I have slept 8+ hours, when really I have had only 5.

So whats my final verdict? After a week of using the Decouverte Under Eye Serum my eye area looks smoother, brighter and the checker at Trader Joes who I see every week told me that I look "rested" when I was in there this weekend. Not sure if it is all related to the eye serum but it's the only thing that I have done different.

It is a bit pricey but if you are looking to invest into a high quality product that you will see noticeable results with, I highly recommend this.

Skin Care Tip of the Week *How to help prevent body acne*

Monday, April 16, 2012


With spring in full swing and summer just a few months away, maxi dresses and tank tops are bound to be making their way into your wardrobe. Having back and chest acne can be annoying and frustrating.

While each case of body acne can be triggered by something different, here are a few simple tips that can help keep the skin on your body clear.

Wear breathable cotton t-shirts to bed- If you are prone to back and chest acne it is very important that you let your skin breath at night.

Don't sit around in your sweaty workout clothes- If you are an avid gym goer, make sure you change your sports bra and gym shirt as soon as you can after working out. Leaving on your sweaty sports bra is a sure way to cause irritation and breakouts due to bacteria and perspiration not being washed off.

Use tea tree oil as a spot treatment/toner- Tea tree oil is awesome! It is an all natural topical treatment that can be used to treat acne. It not only kills the acne causing bacteria but it also reduces redness and inflammation. To read more about tee tree oil see this post.

Dry brush your skin- The dry brush technique helps to open blocked pores and exfoliate dead skin cells which can really help improve skin texture and appearance. This really needs a post all on its own (which I will eventually do). You always want to dry brush first thing in the morning before you take a shower. For each area of the body there is a different technique. For the back, start brushing at the base of your neck and brush down using fluid stokes down to your tailbone. For your chest, use fluid stokes and brush up. After brushing your skin, rinse off in the shower.

Use an anti-bacterial soap such as colloidal silver antibacterial soap- Colloidal silver soap is the best! I recently discovered this heaven sent soap after doing my own research for annoying pregnancy induced arm breakouts. Its anti-bacterial benefits are amazing and this has completely cleared up any congestion that was on my back and arms. I LOVE this stuff. It is pretty hard to find, but some specialty health food stores will carry it or you can order it online here.

Hope you find these little tips helpful and I hope you feel confident in showing off your shoulders and back this spring and summer.

31 weeks + a herniated belly button and a few other things

Friday, April 13, 2012

Yes, my doctor informed me a few appointments ago that my belly button is indeed herniated. Awesome. The other day I actually contemplated duck taping it down because it looked like a weird alien poking it's nose out of my dress. So sexy I know. On a side note, this is my usual outfit of the day...gym clothes. I have no idea how some ladies keep up with the cute outfits during the last months of their pregnancy (kuddos). I am not one of them.

Whew this week has been tough (herniated belly button aside). I have been experiencing insulin resistance, which is beyond frustrating. Some days I just want to cry because no matter what I eat my blood sugar will rise. Being a diabetic sucks sometimes and if it was a person I would tell it to eff off. Seriously.

To put a little icing on this already not so awesome week, I had a hospital sleepover on Wednesday. I went in for my normal NST appointment and mentioned how I was having some annoying cramping during the day. The nurses checked it out and it turns out I was having some serious contractions. They gave me extra fluid through an IV and some medication. I had to stay over night so they could make sure it stopped and monitor the baby. The baby is doing great and until I get cleared by my Dr. at my next visit I am on bed rest. Not sure exactly how that will work will an almost two year old but I will do my very best. Thank God for my awesome Mom who offers to watch Max often.

Only eight more weeks to go! I can do it...and please stay in there and bake for a little bit longer baby Ronin!

Have a wonderful weekend!

Low Carb Chocolate Chip Muffins

Tuesday, April 10, 2012

A cup of coffee and a warm muffin go hand in hand in my opinion. One unfortunate aspect about the everyday muffin is the fact that they are loaded with sugar and carbs, which can send you into a morning food coma a few hours later...blahh don't you hate it when that happens?

These muffins are not only deee-licious, but they are made without any flour and sugar. Instead, I used almond meal (a low carb flour substitute) and liquid all natural stevia (best thing ever). I used a basic low carb muffin recipe, but made a few tweaks to the recipe to make it my own and to make the muffins a little bit more moist.

What you will need:
  • 2 1/3 cups of almond meal
  • 2 tsp of baking powder
  • 1/4 tsp of salt
  • 4 eggs
  • 1/2 cup of water
  • 1/2 tsp of liquid stevia (you can find this awesome sugar substitute at your local health food grocery store)
  • 1/3 cup of gluten free chocolate chips (regular is fine to use if you can not find GF)
Directions:
  1. Preheat oven to 350 degrees.
  2. Mix together the dry ingredients first. Add wet ingredients and mix until they are all blended together.
  3. Place baking cups into muffin tray. Scoop enough muffin batter to fill each muffin tin about 2/3 of the way full.
  4. Bake for 15 minutes.
These are light, moist, SUPER low carb and the perfect little treat to have with a morning cup of coffee or tea. I may or may not have eaten 3 in one sitting ;)

Skin Care Tip of the Week *DIY salicylic (aspirin) mask*

Monday, April 9, 2012

A typical professional chemical peel will cost you anywhere from $60-$150 depending on which one you go with and how deep you want to go. I charged $60-$80 to give you an idea.

This week I am going to show you how to make your own at home (very mild) inexpensive salicylic peel using aspirin. This treatment is pretty awesome!

The "Aspirin Mask" has been around forever, although Dr. Oz came up with the brilliant idea of adding lemon juice to it. The lemon juice will give your skin a natural boost of vitamin C, further assisting in making this home treatment top notch.

How does it work?

Aspirin is actually a form of salicylic acid. Salicylic acid increases cell exfoliation and helps with discoloration, fine lines and wrinkles.

What you will need:
  • 4 non coated aspirin tablets
  • 1 tsp of freshly squeezed lemon juice
  • Baking soda
  • Cotton pads

Directions:
  1. Crush up the 4 aspirin and combine with the lemon juice.
  2. Allow the aspirin to dissolve until it turns into a paste like consistency.
  3. Using the cotton pad, apply it evenly across your face, avoiding the eye area.
  4. Leave on for 10 minutes.
  5. Remove with a cotton pad saturated with baking soda and cold water. The baking soda will help neutralize the peel. It may sting a bit when you remove it and this is normal.
  6. Follow up with a good moisturizer and sunscreen.

Precautions:
  • Do not use if you are pregnant or breastfeeding.
  • Do not use if you are allergic to aspirin.
  • Do not use if you have Reyes syndrome.
  • Please use common sense when using this treatment. If it is burning or irritating your skin remove it immediately.
  • Always apply sunscreen after using any type of salicylic acid, since this will make you more sensitive to sun exposure.

Please note: This does not replace a professional treatment, but it will help with minor breakouts and congestion of the skin. It will also help soften and brighten your skin. If you are experiencing severe acne please make an appointment with a licensed and qualified esthetician to have a skin consultation.

If you like the idea of slightly more aggressive treatments that you can do in the comfort of your own home, I also highly recommend the DIY Vitamin C Mask, which is one of my personal favorites!


Things That Make Me Say Yeay

Friday, April 6, 2012

Getting my eyebrows threaded for the first time. Best thing ever! I will never get them waxed again. No redness, no breakouts and I feel like they look so much better compared to when I get them waxed.

A beautiful weekend wine country walk with my family...ahhh wine I miss you!

My new crochet necklace made by my sweet friend. I LOVE it. We did a little crafty trade...polymer clay beaded necklace for a crochet necklace. I think it will look perfect with a plain white tee. You can check out her adorable shop here.

Sports themed Easter eggs for Max. This will be his first year doing an Easter egg hunt and I am pretty excited about it!

Ian and I with Max last Easter. I can not wait for our second addition to be here so he can join in on all the fun.

Hope you all have a wonderful weekend and Easter!

Pin-tester *Recycling Old Candles*

Thursday, April 5, 2012


This week I tested out a pin that came from a blog called Happy-Go-Lucky.    

I was recently cleaning out the closet of my esthetician room, which is now getting transformed into the baby's nursery and realized I had a bunch of aromatherapy candles that were just taking up space.  I was about to toss them, but then I came across a great tutorial on Pinterest.  I knew this was a pin that I needed to put into action asap!  The original poster used candles in jars so I made a few little changes (I know I originally said I would follow instructions fully but I broke the rules) and I am pretty happy with how my new candle turned out.

I have made my own candles before, but this was so much more cost effective (love that phrase). 

What you will need:
  • Old candles
  • Candle wicks (you can find these at a craft store)
  • A large melting container (I used a giant mason jar that was leftover from this party)
  • A glass jar
Directions:
  1. I hammered up (Max was wondering what had gotten into me I think ha) my old candles so they were smaller chunks for easier melting. I don't actually know if this makes it easier to melt, but it made sense to me at the time.
  2. Boil a hot pot of water. Place the container filled with the candle chunks into the water and let melt.
  3. Place your wick in the other glass jar. When the candles have melted pour wax into glass jar.
  4. Trim wick once wax has dried and you have a new candle!

I love my new giant vanilla scented candle!  Plus...this whole project only cost me $2 (price of the wicks). I don't think I have ever seen a candle this big for $2, so I am pretty stoked about that!

Have you tested out any pins recently that were a flop or a success?  I would love to hear!

DIY Polymer Clay Coral Bracelets

Wednesday, April 4, 2012

materials needed I recently rediscovered a little box of shells that I smuggled across the Mexican boarder (totally illegal I know) a few years ago when we took a trip to Puerto Vallarta. I was sifting through them wondering what I was going to do with them and I came across this great little piece of coral (shown above). I realized it was the perfect "stamp" for polymer clay. I began playing around with a few designs and this is what I came up with...

What you will need:
  • Neutral polymer clay colors
  • A piece of coral (obviously not everyone smuggles coral across the border like me, so a rough rock will work too)
  • A polymer clay bead piercing tool (you can also use a toothpick)
  • A thin bracelet to use as a guideline
  • Razor
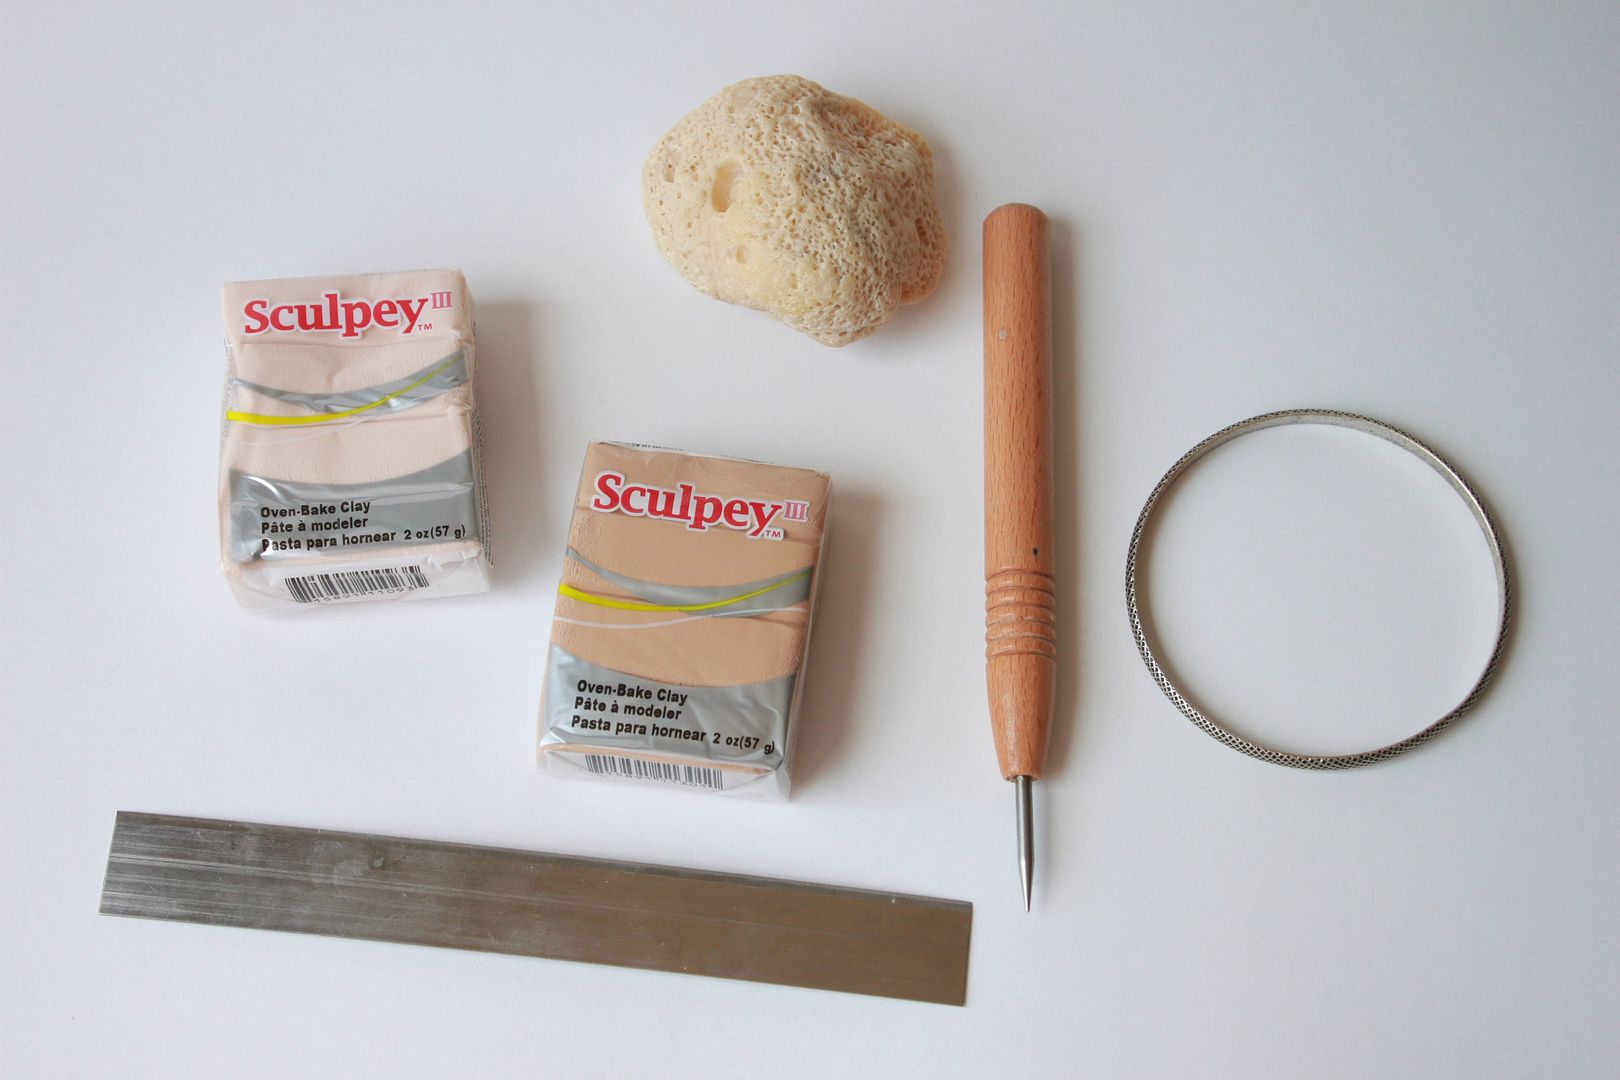
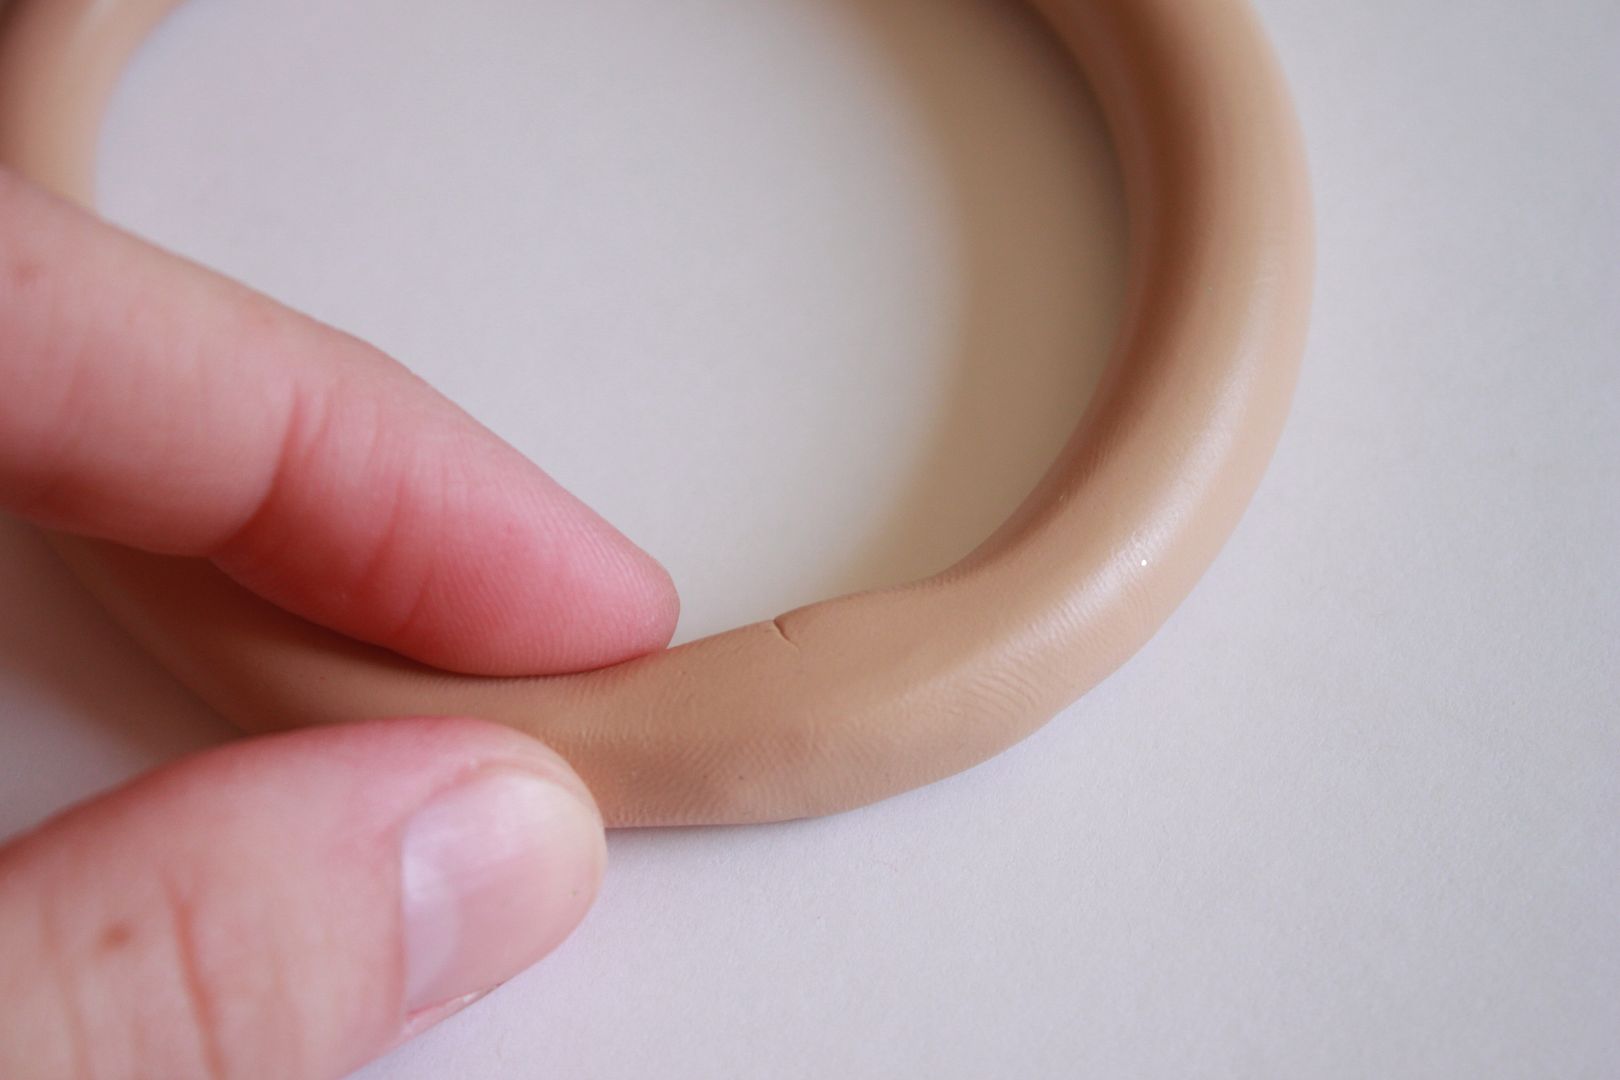
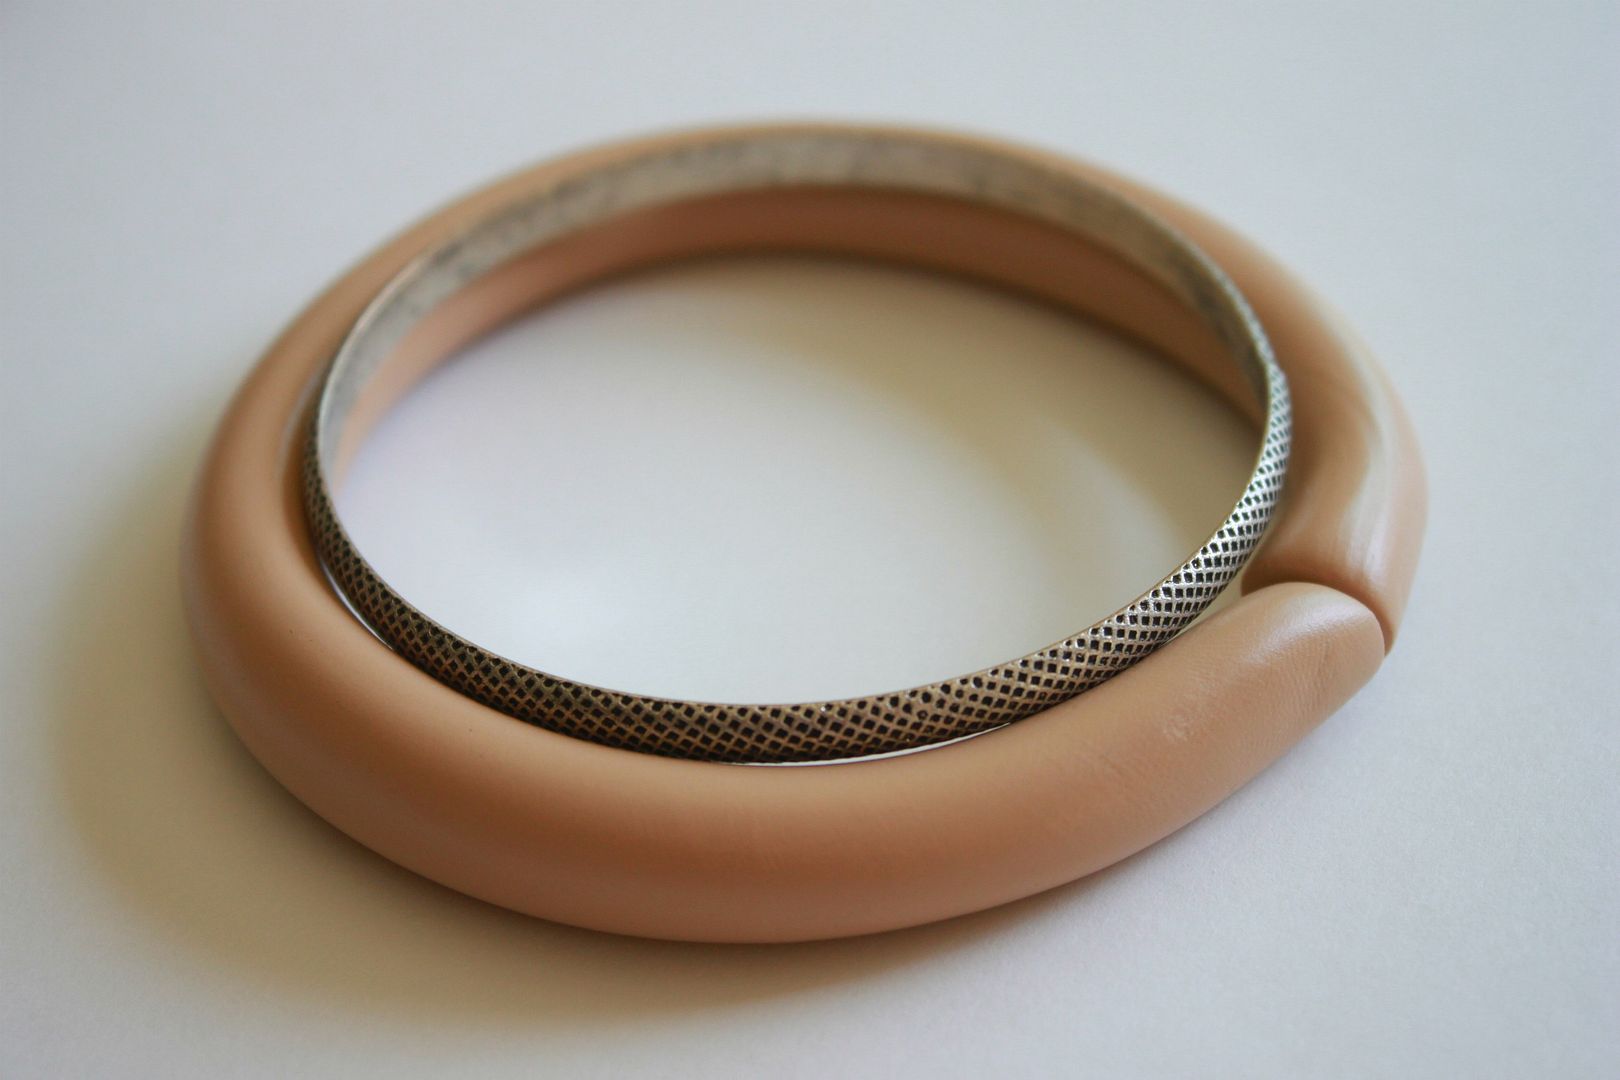
Start by conditioning your clay.  Roll out a long tube of clay, which will be the bracelet. For more details on how to do this, see this post.  Use your guideline bracelet and determine how big you are going to make it.  Use the razor to slice off the remainder.


Gently join the two ends together.


Take the piece of coral (or rough rock) and gently stamp your bracelet, giving it a coral like appearance.


I love how unique each bracelet turned out, each being different than the one made prior.  I will be wearing these often! 


Related Posts Plugin for WordPress, Blogger...